

Mercedes FBS4 Manager User Manual

Mercedes fbs4 manager


User manual
Version 1.8
www.abrites.com
2026
www.abrites.com
Important notes
Warranty
The Abrites software and hardware products are developed, designed and manufactured by Abrites Ltd. During the production process we comply to all safety and quality regulations and standards, aiming at highest production quality. The Abrites hardware and software products are designed to build a coherent ecosystem, which effectively solves a wide range of vehicle-related tasks, such as:
All software and hardware products by Abrites Ltd. are copyrighted. Permission is granted to copy Abrites software files for your own back-up purposes only. Should you wish to copy this manual or parts of it, you are granted permission only in case it is used with Abrites products, has “Abrites Ltd.” written on all copies, and is used for actions that comply to respective local law and regulations.
You, as a purchaser of Abrites hardware products, are entitled of a two-year warranty. If the hardware product you have purchased has been properly connected, and used according to its respective instructions, it should function correctly. In case the product does not function as expected, you are able to claim warranty within the stated terms. Abrites Ltd. is entitled to require evidence of the defect or malfunction, upon which the decision to repair or substitute the product shall be made.
There are certain conditions, upon which the warranty cannot be applied. The warranty shall not apply to damages and defects caused by natural disaster, misuse, improper use, unusual use, negligence, failure to observe the instructions for use issued by Abrites, modifications of the device, repair works performed by unauthorized persons. For example, when the damage of the hardware has occurred due to incompatible electricity supply, mechanical or water damage, as well as fire, flood or thunder storm, the warranty does not apply.
Each warranty claim is inspected individually by our team and the decision is based upon thorough case consideration.
Read the full hardware warranty terms on our website.
Mercedes FBS4 Manager User Manual
2026
2
www.abrites.com
Copyright information
Safety information
Copyright:
Notices:
The Abrites products are to be used by trained and experienced users in diagnostics and reprogramming of vehicles and equipment. The user is assumed to have a good understanding of vehicle electronic systems, as well as potential hazards while working around vehicles. There are numerous safety situations that cannot be foreseen, thus we recommend that the user read and follow all safety messages in the available manual, on all equipment they use, including vehicle manuals, as well as internal shop documents and operating procedures.
Some important points:
Block all wheels of the vehicle when testing. Be cautious when working around electricity.
In case any technical difficulties occur, please contact the
Abrites Support Team by email at support@abrites.com.
Mercedes FBS4 Manager User Manual
2026
3
Table of contents
www.abrites.com

Mercedes FBS4 Manager User Manual
2026
4
System requirements: 2.2 Getting Started
4.1 Engine Control Unit (ECU) replacement procedure
4.1.1 ECU replacement WITH previously saved personalization data (scenario 1):
4.1.2 ECU replacement WITHOUT previously saved personalization data (scenario 2):
4.1.3 MRG1/MRD1 replacement WITHOUT previously saved personalization data
4.3.1 Virginization in the vehicle by OBDII:
4.4 Read FBS4 Personalization Data
4.4.1 Read FBS4 Personalization Data by OBDII
Reading personalization data by OBDII is available for the following units:
4.4.2 Read FBS4 Personalization Data on bench
4.7 MRD1/MRG1 ECUs - CB030 - Mercedes-Benz MD/MG ECU connection cable
Table of contents
www.abrites.com
Mercedes FBS4 Manager User Manual
2026
5
4.8.1 CRD3xxNFZ replacement WITH previously saved personalization data
Personalization steps :
4.8.2 CRD3xxNFZ replacement WITHOUT previously saved personalization data
5.1.1 VGS4-NAG2 Personalization with Previously saved data
5.1.2 VGS4-NAG2 Personalization WITHOUT previously saved data
5.1.3 VGS4-NAG2 Legacy Procedures
5.2.1 VGSNAG3 Personalization with previously saved data
5.2.2 VGSNAG3 Personalization WITHOUT previously saved data
5.3.1 Personalization with previously saved data
5.3.2 Personalization without previously saved data
5.4 VGS3-FDCT Mercedes (TCM9 FDCT)
5.4.1 Personalization procedure
5.4.2 VGS3-FDCT Mercedes (TCM9 FDCT) Connection /connection cable
6.1 Direct Select Module (DSM) replacement procedure
Table of contents
www.abrites.com
Mercedes FBS4 Manager User Manual
2026
6
www.abrites.com
List of revisions
Date
Chapter
Description
Revision
Mercedes FBS4 Manager User Manual
2026
23.12.2022
1.0
ALL
Document created.
28.03.2023
4 & 5
4 - updated; 5 - created
1.1
21.09.2023
ALL
ECU, TCU, DSM, Quick Start.
1.2
10.11.2023
4.2.1
CB030 information
1.3
20.02.2024
4 & 5
FBS4 unit replacement procedures (MN034)
1.4
22.10.2024
5
VGS4NAG2
1.5
20.08.2025
4, 5, 6, 7
Update on many procedures
1.6
29.04.2026
9
Battery Unlock / Reset
1.7
7
14.07.2026
5.4, 4.8
CRD3xxNFZ & VGS3-FDCT
1.8
www.abrites.com
Mercedes FBS4 Manager User Manual
2026
1. Introduction
8
Congratulations on choosing our wonderful product!
The “Mercedes FBS4 Manager” is an Online server based Abrites software for Mercedes FBS4 vehicles
In order to operate, the software requires you to have an AVDI interface, a Windows based PC with a minimum of 1024MB RAM, 64GB of free hard drive space and at least Windows 7 64bit Service Pack 1 or later version to operate. For optimal operation, it is always recommended to have the latest software version installed, active AMS, and a stable Internet connection.
With the help of this software you can perform DAS module replacement Mercedes FBS4 vehicles.
For proper operation of your diagnostic software you will need a corresponding interface for connection between your PC and vehicle named “AVDI”. “AVDI” stands for “Abrites Vehicle Diagnostic Interface.” It is produced by Abrites Ltd. and intended to act as an interface between the PC and the electronic control units.
Please check the “license viewer” installed on your computer for your unique interface ID number.
The software is in constant development and its functionality is ever growing. The intentions for the Abrites Software are to be used by automotive specialists, but it is simultaneously designed in such a way that is accessible to enthusiasts as well.
AVDI should be used with ABRITES software produced by Abrites Ltd.
ABRITES is a trade mark of Abrites Ltd
www.abrites.com
Mercedes FBS4 Manager User Manual
2026
2.1 Scope of the manual
This document describes the usage of Abrites Mercedes FBS4 Manager. The document is applicable for the latest software version. In this manual we suppose that the software for your AVDI interface is already installed. Please refer the “AVDI Common User’s Manual” in case it is not.
System requirements:
(Recommended 4GB) and manually updated COM Port driver.
2. General Information
9
www.abrites.com
Mercedes FBS4 Manager User Manual
2026

2.2 Getting Started
You can start Abrites Mercedes FBS4 Manager by starting the Abrites Quick Start application and selecting Mercedes icon first.
When the Abrites Diagnostics for Mercedes application is started the main screen of the application will appear where you can select the Mercedes FBS4 Manager.
10

www.abrites.com
Mercedes FBS4 Manager User Manual
2026
11

FBS4 Manager is the software that lets you work with DAS modules from the FBS4 platforms. The software is constantly growing and its functionalities will be expanding with future updates. The main screen of the software gives you the unit selection and shows the buttons with the available special functions. You can work with the following modules:
Functionalities:
3. FBS4 Manager
www.abrites.com
Mercedes FBS4 Manager User Manual
2026
12

Engine Control Unit section of the FBS4 Manager has the following functionalities:
All that lets you do a complete ECU exchange so that the vehicle can start and run properly.
Abrites FBS4 Manager is able to personalize a virgin or new unit in ALL cases.
4. ECU Replacement
www.abrites.com
Mercedes FBS4 Manager User Manual
2026
13
4.1 Engine Control Unit (ECU) replacement procedure
Engine Control Unit replacement procedure has the following specific steps:
Abrites FBS4 Manager is able to personalize a virgin or new unit in ALL cases.
IMPORTANT! MRD1/MRG1 ECU have a separate procedure for personalization without previously saved data, available a few pages below.
There are 2 general scenarios:
Here is the procedure from scenario 1 explained briefly, each step will be expanded with more details later in a dedicated section:
N.B. ALL virgin or new modules can be personalized with no restrictions!
Here is the procedure from scenario 2 briefly explained, each step will be expanded with more details later in a dedicated section:
Supported units when NO PREVIOUSLY PERSONALIZATION DATA IS AVAILABLE:
www.abrites.com
Mercedes FBS4 Manager User Manual
2026
14
4.1.1 ECU replacement WITH previously saved personalization data (scenario 1):
Step 1: You need to be able to read the original unit’s data. The procedure is executed in the vehicle by OBDII in most cases, however, certain units require specific connections described later in this user manual. Original ECU needs to be in place > open the ECU selection of the FBS4 manager, and press “Info” to establish connection to the unit, once the unit is read, press the “Save” button. This would read the required FBS4 personalization data from the ECU and let you save it to a file located on your computer.
Step 2: Install the replacement ECU in the vehicle.
If you are using a new or a virgin unit you can proceed to Step 4
Step 3: If you are working with a used donor unit, you will have to set it to virgin state.
To do that, click the “Info” button to read the unit and check its’ unit status. Press the “Virgin” button to set the unit to virgin state. Procedure is executed via OBDII in most of the cases, but there are units that are not covered via OBDII, and you would have to go and do it on bench, there is dedicated procedure with all details explained.
Step 4: You would now have to press “Personalize“ button, which would ask you to upload the file, previously saved from the original ECU. Procedure is executed via OBDII and direct CAN Connection (Blue CAN wires) Once connection is established, a new screen will come up, make sure you select “standard” option!
Once done, you can press the “Info” button and check if the unit is personalized.
The vehicle should start normally, there is no need to “Activate” the unit, as it gets activated automatically after 100 ignition cycles, while it operates normally in the meantime.
Step 5:Last step to complete the procedure is to write the VIN of the vehicle into the unit by pressing the “VIN“ button, and a pop-up window will appear where you need to write the correct VIN to the unit
www.abrites.com
Mercedes FBS4 Manager User Manual
2026
15
4.1.2 ECU replacement WITHOUT previously saved personalization data (scenario 2):
Step 1: Install the replacement ECU in the vehicle.
If you are using a new or a virgin unit you can proceed to Step 3
Step 2: If you are working with a used donor unit, you will have to set it to virgin state.
To do that, click the “Info” button to read the unit and check its’ unit status. Press the “Virgin” button to set the unit to virgin state. Procedure is executed via OBDII in most of the cases, but there are units that are not covered via OBDII, and you would have to go and do it on bench, there is dedicated procedure with all details explained.
Step 3: You would now have to press “Personalize“ button, which would ask you to upload the file, previously saved from the original ECU. Here you have to “cancel” the upload as the original unit is missing or not available for reading. Procedure is executed via OBDII. Once connection is established, a new screen will come up, make sure you select “standard” option!
Once done, you can press the “Info” button and check if the unit is personalized.
The vehicle should start normally, there is no need to “Activate” the unit, as it gets activated automatically after 100 ignition cycles, while it operates normally in the meantime.
Step 4:Last step to complete the procedure is to write the VIN of the vehicle into the unit by pressing the “VIN“ button, and a pop-up window will appear where you need to write the correct VIN to the unit
MN034 license required!
Supported units when NO PREVIOUSLY PERSONALIZATION DATA IS AVAILABLE:
www.abrites.com
Mercedes FBS4 Manager User Manual
2026
16
4.1.3 MRG1/MRD1 replacement WITHOUT previously saved personalization data
Preparation:
When no original unit is not available, or completely damaged and not possible to read, you would need to do the following:
Now set up the donor unit on bench, using ZN151 DS Box and CB030
N.B. Unit activation happens automatically after 100 ignition cycles.
www.abrites.com
Mercedes FBS4 Manager User Manual
2026
17
4.2 Connections:
We are able to work with the following connections in general:
In the vehicle:
Bench Connections:
CRR1 (SID307) and CRR1+ (SID310) – Done completely by OBDII
MRG1 and MRD1 bench connection - using CB030 (with or without ZN051 DS Box) - details in the CB030 dedicated section 4.3 of this user manual.
CRR2 (MD1CS006) - bench connection using DS Box and CB401
MED41 (MED17.7.7) - bench connection using DS Box and CB401
VGS4NAG2 - ABProg programmer!
DSM - ABProg programmer!
www.abrites.com
Mercedes FBS4 Manager User Manual
2026
18
4.3 Virginization procedure:
If you have a donor unit that is not new, you need to make it virgin.
You can do that as follows:
4.3.1 Virginization in the vehicle by OBDII:
Supported units:
MED17, EDC17, SID310, Delphi-CRD3 ECUs, (CR40, CR41, CR42, CR43, CR6, CR60, CR61, MED40, MED41, MED177, MED1773, MED1775, CRR1, CRR1+, CRD3, CRD3S2, CRD3NFZ, CRD3S2NFZ).
4.3.2 Virginization on bench:
You can set a unit into virgin state, using bench connection, and get it ready for personalization.
For that, you can use the following set-up options:
ZN074 set recommended to provide power supply to the ZN051 DS Box
List of modules that require more specific bench connection for virginization
Connection diagrams for each module are available later in this user manual.
Once you have made the proper connections and have powered up the whole set-up, execute the following steps:
NB! Please press the “Info” button again to make sure the unit is properly set to “Virgin state”
www.abrites.com
Mercedes FBS4 Manager User Manual
2026
19
4.4 Read FBS4 Personalization Data
Personalization data can be read in the vehicle or on bench.
4.4.1 Read FBS4 Personalization Data by OBDII
Reading personalization data by OBDII is available for the following units:
4.4.2 Read FBS4 Personalization Data on bench
You can find the connection diagrams for bench reading in the next section.
4.5 VIN Exchange
There are a few specifics with VIN exchange in Mercedes FBS4 vehicles.
VIN exchange can be executed in the vehicle via OBDII, or on bench. If the procedure would not go trough, you would need a ZN051 DS Box connection to be able to update the VIN of the unit.
When performing personalization without previously saved FBS data, you would have to set the VIN of the unit before the actual personalization, in other words, the personalization procedure stats with setting the VIN of the vehicle to the donor unit. Normally, VIN is set after the personalization. In case you use the procedure with no personalization data, it would not actually go trough, if the VIN of the donor unit is not the VIN of the vehicle.
www.abrites.com
Mercedes FBS4 Manager User Manual
2026
20
4.6 ECU BENCH DIAGRAMS:
CB403 PIN OUT:
1 - pink - “IGN”
2 - yellow and yellow/white - “B+” (on both wires)
3 - red/blue - “K-LINE 1”
4 - purple - “BOOT 2”
5 - white - “BOOT 1”
6 - green - “T2”
7 - brown - “T1”
8 - red - “CAN H”
9 - green/white - “T3”
10 - green/brown - “T4”
11 - black - “GND”
12 - gray - “GND”
13 - yellow/brown - “B+ PERMANENT”
14 - blue - “CAN L”
15 - grey/pink - “K-LINE 7”
CB401 DB15 cable Legend:
Power - Yellow (B+)
IGN - Orange (IGN)
GND - Black (GND)
CAN HI - Red (CAN6)
CAN LOW - Blue (CAN14)
T1 - Brown (T1)
T2 - Green (T2)
Boot - White
Connection diagrams on the next page
Colors are dedicated to the CB401 cable.
www.abrites.com
Mercedes FBS4 Manager User Manual
2026
MED40 BOSCH
MED17.7.1 TC1797 V1
MED17.7.3 TC1797
MED17.7.3.1 TC1797 MED177
MED17.7.5 TC1793 MED177
MED177AMG
MED177V6LA
21

T96 PIN 83 – PWM
T96 PIN 58 – PWM
T58 PIN 2 – GND-
T58 PIN 5 – 12V+
T58 PIN 15 – IGN
T58 PIN 41 – CAN-H
T58 PIN 54 – CAN-L
www.abrites.com
Mercedes FBS4 Manager User Manual
2026
MED17.7.1 TC1797 V2
MED17.7.2 TC1797
MED40AMG
22

T96 PIN 81 – PWM
T96 PIN 58 – PWM
T58 PIN 3 – 12V+ GND-
T58 PIN 4 – GND-
T58 PIN 15 – IGN
T58 PIN 41 – CAN-H
T58 PIN 54 – CAN-L
www.abrites.com
Mercedes FBS4 Manager User Manual
2026
23

MED17.7.8 TC1797 MED177
T105 PIN 13 - PWM
T105 PIN 34 - PWM
T91 PIN 1 – GND
T91 PIN 5 – B+
T91 PIN 50 - IGN
T91 PIN 79 – CAN H
T91 PIN 80 – CAN L
www.abrites.com
Mercedes FBS4 Manager User Manual
2026
CR61 (EDC17CP57) (BOSCH EDC17CP57 TC1793)

CR42 (EDC17CP46) BOSCH EDC17CP46 TC1797
24

T96 PIN 39 - PWM
T96 PIN 35 - PWM
T58 PIN 3 - 12V+
T58 PIN 2 - GND-
T58 PIN 15 - IGN
T58 PIN 41 - CAN H
T58 PIN 54 - CAN L
T96 PIN 35 - PWM
T96 PIN 39 - PWM
T58 PIN 3 - 12V+
T58 PIN 2 - GND-
T58 PIN 15 - IGN
T58 PIN 41 - CAN H
T58 PIN 54 - CAN L
www.abrites.com
Mercedes FBS4 Manager User Manual
2026
CR6 (EDC17CP10) BOSCH EDC17CP10 TC1796
25

T96 PIN 39 - PWM
T96 PIN 35 - PWM
T58 PIN 3 - 12V+
T58 PIN 2 - GND-
T58 PIN 15 - IGN
T58 PIN 41 - CAN H
T58 PIN 54 - CAN L
www.abrites.com
Mercedes FBS4 Manager User Manual
2026
CR41 (EDC17C66)
CR41R (EDC17C66)
CR40 (EDC17C43)

T58 PIN 3 - 12V+
T58 PIN 6 - GND-
T58 PIN 15 - IGN
T58 PIN 40 - CAN H
T58 PIN 53 - CAN L
T96 PIN 41 - PWM
T96 PIN 44 - PWM
T58 Pin 3 - 12V
T58 Pin 4 - GND
T58 Pin 15 - IGN
T58 Pin 41 - CAN H
T58 Pin 54 - CAN L
T96 Pin 35 - PWM
T96 Pin 39 - PWM
26

www.abrites.com
Mercedes FBS4 Manager User Manual
2026
27

CR43 (EDC17CP60)
T58 PIN 5 - 12V+
T58 PIN 4 - GND-
T58 PIN 15 - IGN
T58 PIN 16 - 12V
T58 PIN 41 -CAN H
T58 PIN 54 -CAN L
T96 PIN 38 - PWM
T96 PIN 89 - PWM
www.abrites.com
Mercedes FBS4 Manager User Manual
2026

28

MED41 (MED17.7.7) V1 - CB403 Recommended
MED41 (MED17.7.7) V2 - CB403 Recommended
www.abrites.com
Mercedes FBS4 Manager User Manual
2026
Т96 PIN 35 - PWM
Т96 PIN 39 - PWM
T58 PIN 2 - GND
T58 PIN 3 - B+ 12V
T58 PIN 15 - B+ 12V
T58 PIN 41 - CAN H
29

CR61_470 V1 (EDC17CP57) - CB403 Recommended
www.abrites.com
Mercedes FBS4 Manager User Manual
2026
CR61_470 V2 (EDC17CP57) - CB403 Recommended

MED40 (MED17.7.1)
Т96 PIN 38 - PWM
Т96 PIN 87 - PWM
T58 PIN 2 - GND
T58 PIN 3 - B+ 12V
T58 PIN 15 - B+ 12V
T58 PIN 16 - B+ 12V
T58 PIN 41 - CAN H
T58 PIN 54 - CAN L
30

Т96 PIN 58 - PWM
Т96 PIN 83 - PWM
T58 PIN 2 - GND
T58 PIN 5 - B+ 12V
T58 PIN 15 - IGN
T58 PIN 41 - CAN H
T58 PIN 54 - CAN L
www.abrites.com
Mercedes FBS4 Manager User Manual
2026
MED40 (MED17.7.2)
MED17.7.1 V2
31

Т96 PIN 81 - PWM
Т96 PIN 58 - PWM
T58 PIN 2 - GND
T58 PIN 5 - B+ 12V
T58 PIN 15 - IGN
T58 PIN 41 - CAN H
T58 PIN 54 - CAN L
www.abrites.com
Mercedes FBS4 Manager User Manual
2026
CRR2 MD1CS006 TC298TP V1
CRR2 MD1CS006 TC298TP V1

32

www.abrites.com
Mercedes FBS4 Manager User Manual
2026
MRG1 (including 2021+) BOSCH MG1CP002 SPC577 - CB030 strongly recommended!
CB030 has dedicated connector for MG1/MRG1 ECUs
Please check the next section for more details
MRD1 (including 2021+) BOSCH MD1CP002 SPC577 - CB030 strongly recommended!
CB030 has dedicated connector for MD1/MRD1 ECUs
Please check the next section for more details

33

www.abrites.com
Mercedes FBS4 Manager User Manual
2026
4.7 MRD1/MRG1 ECUs - CB030 - Mercedes-Benz MD/MG ECU connection cable
The CB030 cable is intended for bench connection with the Engine Control Units from BOSCH types MD1 and MG1 (MRD1, MRG1) in Mercedes-Benz vehicles to:
IMPORTANT: Units produced after 2021 are locked! You are able to personalize brand new units, not ordered for the vehicle from a dealership.
Supported Units:
BOSCH MD1 and MG1 Engine Control Units
Connection:
Connect CB030 to AVDI and ZN051 DS Box - connect DB25 connector and DB15 connector of CB030 to DS-BOX. Power supply should be provided to the ZN051’s dedicated slots. ZN051 DS Box is connected to AVDI via CB402.
ZN074 can be used for providing power supply in both cases.
The CB030 has two identical connectors with different pin outs and are labeled for MG1 and MD1 ECUs..
N.B. To avoid damage or malfunction to the ECU or your AVDI, make sure you use the correct type of connector for the ECU you are working with!
34
www.abrites.com
Mercedes FBS4 Manager User Manual
2026
4.8 DELPHI CRD3xxNFZ ECU’s
Delphi CRD3xxNFZ ECU’s can now be identified, virginized, and personalized via OBDII !
4.8.1 CRD3xxNFZ replacement WITH previously saved personalization data
Personalization steps :
When originals ECU personalization data is sucesfully saved, the donor ECU module could be mounted in the vehicle.
4. Open the Mercedes FBS4 software and select “ECU”.
5. Press “Info” button to establish connection.
6. Set the unit to “Virgin” state trough the dedicated button.
7. IMPORTANT: At this stage you need to set the VIN of the vehicle to the donor ECU
8. Once the VIN is set proceed to next step.
9. Press “Personalize” and select the file with the saved personalization data from the original ECU.
10. Once complete, software would ask you to turn IGN OFF and ON to finalize the procedure
N.B. Unit activation happens automatically after 100 ignition cycles.
35
4.8.2 CRD3xxNFZ replacement WITHOUT previously saved personalization data
Important: Whenever possible, always use the original unit’s data to adapt the donor unit.
When no original unit is not available, or completely damaged and not possible to read, you would need to do the following:
Preparation:
Personalization steps:
N.B. Unit activation happens automatically after 100 ignition cycles.
www.abrites.com
Mercedes FBS4 Manager User Manual
2026
5. TCU Replacement
36
Transmission Control Unit section of the FBS4 Manager has the following functionalities:
This will allow you to perform a complete TCU exchange, so that the vehicle can start and run properly.
One of the many benefits of these procedures is that when adapting transmissions, we do not clone them, we only transfer the necessary Immo-related data (FBS Data), keeping donor’s calibration values.
Supported units:
For details on how to work on each of the Transmission Control Units, please check the dedicated section of this user manual
Procedures may differ depending on your active licenses. Please consult Abrites team for details.
After the transmission is personalized, it is important to ensure that the software versions of the original transmission match those of the donor TCU.
The “Program” button allows you to update the donor TCU’s software versions to align with the original transmission versions.
You have two options: either load your own files(.cff) by browsing your PC, if available, or use our server to program the TCU with the correct software versions.
If you are replacing a TCU (only the electronics) it is important to save a back up of the configuration of the original TCU (Utilities > Save all Config data).
If you are replacing the whole transmission unit (electronics and mechanical part) then you would have to use the configuration that is on the donor TCU.
www.abrites.com
Mercedes FBS4 Manager User Manual
2026
37
5.1 VGS4 NAG2 7G-Tronic
Procedures are very specific depending on your active licenses. If you have all relevant Abrites Mercedes software licenses VGS4-NAG2 replacement procedure is as follows:
5.1.1 VGS4-NAG2 Personalization with Previously saved data
Original unit in the vehicle.
Connections: In the vehicle by OBDII
Read and save VGS4-NAG2 FBS data procedure:
Once the reading is complete and the file is saved, please make sure you also make a back-up of the Configuration data of the unit as follows: TCU > “Utilities”> “Save All Config Data. This data together with the FBS4 data will let you personalize a unit.
Personalization procedure:
N.B. Unit activation happens automatically after 100 ignition cycles.
www.abrites.com
Mercedes FBS4 Manager User Manual
2026
38
5.1.2 VGS4-NAG2 Personalization WITHOUT previously saved data
Connections: In the vehicle by OBDII and internal CAN (diagnostic CAN) - CB012 Direct CAN-BUS/LIN-BUS Connection Cable Set is recommended!
Personalization procedure:
N.B. Unit activation happens automatically after 100 ignition cycles.
www.abrites.com
Mercedes FBS4 Manager User Manual
2026
39
5.1.3 VGS4-NAG2 Legacy Procedures
Procedures below are replaced with the MN039 license
If you do not have the latest software licenses, or you will have to do some mechanical work. Unit needs to be opened, and ABProg programmer is used, SET088 is recommended, with that, you can do the following:
If MN034 license is active, personalization procedure can be executed via OBDII and internal CAN connection. Personalization without previously saved FBS data is also available!
SET088 has ABProg programmer, and it is recommended when working with the VGS4-0-NAG2 TCUs.
We are aware of 2 types or generations of VGS4NAG2 units, which have different type of connectors and PCBs: VGS4-0 NAG2 (Type 1), and VGS4-500 NAG2 (Type 2)
NOTE: Once you cut open the TCU, remove the jelly very gently only where you need to connect (or solder), to avoid damage to the unit!
After you complete the task, make sure you close the TCU pcb well, and glue the cover so no oil can enter and damage the unit!
NB! Make sure your ABPRrog programmer is updated with the latest firmware.
Important: In some cases the TCU will remain in a state that does not let you operate with it, once the “Info” button is pressed, power consumption will drastically drop. In this situation you have to turn OFF the power supply and turn it back ON right away. Power consumption will remain below 0.2A (0.16-0.19) and this is the state when the TCU will respond normally to the software.
www.abrites.com
Mercedes FBS4 Manager User Manual
2026
The SET088 contains all the necessary hardware tools to open and connect to the 7G-Tronic VGS4-0 NAG2 in FBS4 vehicles. This set allows you to open the transmission control unit and connect to the required points without soldering. The set in combination with the MN035 license offers a great way to reuse second-hand modules in FBS4 vehicles, enabling you to reset the donor module, and adapt it into the vehicle.
Functionalities:
.Open the transmission control unit type 7G-Tronic VGS4-0 NAG2
.Connect to the correct points on the module’s PCB using a custom designated adapter
Supported vehicles:
All vehicles with VGS4-0 NAG2 7G-Tronic TCU of the FBS4/DAS4 generation Mercedes-Benz
Contents of the set:
N.B: ZN090 has 2 LEDs, 1 indicates that connection with the TCU is established (target) and the other indicates the connection to ABPROG is established. You need to have them both ON, so that you can proceed to working with the TCU.
40

www.abrites.com
Mercedes FBS4 Manager User Manual
2026
41
Type 1: VGS4-0-NAG2
Read FBS data is available in 2 ways:
Read and save VGS4-0-NAG2 FBS data procedure:
Once the reading is complete and the file is saved, please make sure you also make a back-up of the Configuration data of the unit as follows: TCU > “Utilities”> “Save All Config Data. This data together with the FBS4 data will let you personalize a unit.
Additionally, write down the software version of the original TCU and it’s VIN in a text file as a backup.
Connections:
Set the unit to virgin state (required if you are using a second hand donor unit)
This procedure is executed only on bench and with the use of an ABProg programmer. SET088 is recommended and MN035 license
Procedure:
www.abrites.com
Mercedes FBS4 Manager User Manual
2026
42
Personalization available in 2 ways:
Here is how to execute the procedure
Connections:
Watch video HERE
www.abrites.com
Mercedes FBS4 Manager User Manual
2026
VGS4-0-NAG2 Connection ABProg or SET088
Option 1: by soldering wires to the specific points on the TCU (diagrams below)
Option 2: with the needle set adapter ZN088
Option 1: DIY connector explained in the dedicated section
Option 2: ribbon cable from the SET88 is connected to the ZN088 and to the ZN090, then ZN090 is connected to ABProg
Option 1: DIY DB25 connector for VGS4NAG2
Option 2: CB088 or the dedicated cable from the CB011 set.
We suggest the power adapter from the ZN074 set and connect it to the CB088 cable from the SET88.
Important: Once you cut open the TCU, remove the jelly very gently only where you need to solder, to avoid damage!
N.B! Please note that there are some variations of these units, and if the unit is not readable when the needles of the ZN088 are connected, you will have to switch the position to the other side.
43

www.abrites.com
Mercedes FBS4 Manager User Manual
2026

44

Examples of where yo cut open the unit and a connection by soldering.
www.abrites.com
Mercedes FBS4 Manager User Manual
2026
DIY DB25 connector - Here is how you can make your DIY connector with a DB25 and the corresponding wires to solder to the TCUs PCB for VGS4-0 NAG2 PCB TYPE 1
DB25 connector is connected to the ZN030 ABProg programmer.
It is very important to pay attention to the specifications on the wired for this connection. Also, it is important that you use isolated wires for that connection.

45

www.abrites.com
Mercedes FBS4 Manager User Manual
2026
Here is how to connect to the unit with CB088 or a DIY connection:
DIY connection for VGS4-0-NAG2 and DB25 to AVDI
PIN 1 TCU Connector CAN H > PIN 7 DB 25 (to AVDI)
PIN 2 TCU Connector CAN L > PIN 15 DB25 (to AVDI)
PIN 4 TCU Connector 12V+ > PIN 17 DB25 (to AVDI)
PIN 5 TCU Connector GND > PIN 5 DB25 (to AVDI)
Resistor R120 Ohm between CAN H and CAN L
Power supply 13.6V power supply is required!

46

www.abrites.com
Mercedes FBS4 Manager User Manual
2026
47
Type 2: VGS4-500-NAG2
Read FBS data is available in 2 ways:
Read and save VGS4-500-NAG2 FBS data procedure:
Once the reading is complete and the file is saved, please make sure you also make a back-up of the Configuration data of the unit as follows: TCU > “Utilities”> “Save All Config Data. This data together with the FBS4 data will let you personalize a unit.
Additionally, write down the software version of the original TCU and it’s VIN in a text file as a backup.
Connections:
Set the unit to virgin state (required if you are using a second hand donor unit)
This procedure is executed only on bench and with the use of an ABProg programmer.
Procedure:
www.abrites.com
Mercedes FBS4 Manager User Manual
2026
48
Personalization available in 2 ways:
Here is how to execute the procedure
Connections:
Watch video HERE
www.abrites.com
Mercedes FBS4 Manager User Manual
2026
Here is how to make a DIY connector with a DB25 that connects to AVDI as follows:
TCU connector CAN L > PIN 15 DB25 (to AVDI)
TCU connector CAN H > PIN 7 DB 25 (to AVDI)
TCU Connector B+ 12V > PIN 17 DB25 (to AVDI)
TCU connector GND- > PIN 5 DB25 (to AVDI)
Resistor R120 Ohm between CAN H and CAN L
Power supply 12V DC to the connector
49

www.abrites.com
Mercedes FBS4 Manager User Manual
2026
DIY DB25 connector for VGS4-500-NAG2
Here is how you can make your DIY connector with a DB25 and the corresponding wires to solder to the TCUs PCB for VGS4NAG2 PCB (VGS4-500-NAG2) TYPE 2
DB25 connector is connected to the ZN030 ABProg programmer.
It is very important to pay attention to the specifications on the wired for this connection. Also, it is important that you use isolated wires for that connection.

50

Here is where you have to cup open the plastic cover of the TCU in order to get access to the PCB for ABProg connection.
www.abrites.com
Mercedes FBS4 Manager User Manual
2026
51
5.2 VGSNAG3 9G-tronic
Procedures are very specific depending on your active licenses. In case of questions, please contact Abrites team for information.
5.2.1 VGSNAG3 Personalization with previously saved data
Procedure has the following requirements to start:
Original unit in the vehicle.
In the vehicle by OBDII for reading
Read and save VGS-NAG3 FBS data procedure:
Once the reading is complete and the file is saved, please make sure you also make a back-up of the Configuration data of the unit as follows: TCU > “Utilities”> “Save All Config Data. This data together with the FBS4 data will let you personalize a unit.
Personalization procedure:
(From this step on, or if you already have a virgin unit, you can proceed working in the vehicle via OBDII and internal CAN connection)
N.B. Unit activation happens automatically after 100 ignition cycles.
www.abrites.com
Mercedes FBS4 Manager User Manual
2026
52
5.2.2 VGSNAG3 Personalization WITHOUT previously saved data
Preparation:
When no original unit is not available, or completely damaged and not possible to read, you would need to do the following:
Now set up the donor unit on bench, using ZN151 DS Box and CB403 - DS-BOX Extended Cable Set for direct connection. Connection information also on the next page
N.B. Unit activation happens automatically after 100 ignition cycles.
www.abrites.com
Mercedes FBS4 Manager User Manual
2026
Connection for:
To establish the proper connections follow the steps:

53

www.abrites.com
Mercedes FBS4 Manager User Manual
2026
5.3 VGS2-FDCT Mercedes
Connection to this TCU can be established with the ZN051 DS Box and the CB403 - DS-BOX Extended Cable Set for direct connection
The connector of the FDCT does not have a PIN for GND, so you have to connect the GND black connector cable anywhere on the metal body of the TCU (see picture below)
To establish the proper connections follow the steps:

54

www.abrites.com
Mercedes FBS4 Manager User Manual
2026
55
5.3.1 Personalization with previously saved data
Procedure has the following requirements to start:
Original unit in the vehicle.
In the vehicle by OBDII for reading
Read and save FBS data procedure:
Once the reading is complete and the file is saved, please make sure you also make a back-up of the Configuration data of the unit as follows: TCU > “Utilities”> “Save All Config Data. This data together with the FBS4 data will let you personalize a unit.
Personalization procedure:
(From this step on, or if you already have a virgin unit, you can proceed working in the vehicle via OBDII and internal CAN connection)
N.B. Unit activation happens automatically after 100 ignition cycles.
N.B. Procedures are very specific depending on your active licenses. In case of questions, please contact Abrites team for information.
www.abrites.com
Mercedes FBS4 Manager User Manual
2026
56
5.3.2 Personalization without previously saved data
When no original unit is available, or completely damaged and not possible to read, you would need to do the following:
Once complete, software would ask you to turn IGN OFF and ON to finalize the procedure
N.B. Unit activation happens automatically after 100 ignition cycles.
www.abrites.com
Mercedes FBS4 Manager User Manual
2026
5.4 VGS3-FDCT Mercedes (TCM9 FDCT)
57
5.4.1 Personalization procedure
Read and save FBS data procedure:
Once the reading process is complete and the file has been saved, please also create a backup of the unit’s configuration data by following these steps:
TCU → Utilities → Save All Config Data
The saved configuration data, along with the FBS4 data, is required to personalize the replacement unit correctly.
Personalization steps :
(From this step on, or if you already have a virgin unit, you can proceed working in the vehicle via OBDII and internal CAN connection) or proceed while the TCU is connected on-bench.
N.B. Unit activation happens automatically after 100 ignition cycles.
www.abrites.com
Mercedes FBS4 Manager User Manual
2026
5.4.2 VGS3-FDCT Mercedes (TCM9 FDCT) Connection /connection cable
58
Custom Cable Pinout:
TCU connector CAN L > PIN 15 of DB25 (to AVDI)
TCU connector CAN H > PIN 7 of DB 25 (to AVDI)
TCU Connector B+ 12V > PIN 17 of DB25 (to AVDI)
TCU connector GND- > PIN 5,6 of DB25 (to AVDI)
Solder the external power supply wires to the DB25 male connector as follows:
+12V → Pin 17
Ground (GND) → Pins 4 and 5
N.B. If you are working with the TCU conductor plate only, use an external power supply rated at 12V /min 1A.
If the TCU conductor plate is still mounted in the transmission and connected through the socket, use an external power supply rated at 12V / min 4A.
www.abrites.com
Mercedes FBS4 Manager User Manual
2026
6. DSM replacement
59
Direct Select Module (DSM/DSM222) section of the FBS4 Manager has the following functionalities:
All that lets you do a complete DSM exchange so that the vehicle can start and run properly.
6.1 Direct Select Module (DSM) replacement procedure
www.abrites.com
Mercedes FBS4 Manager User Manual
2026
60
6.1.1 Personalization with previously saved data
Procedure has the following requirements to start:
Original unit in the vehicle.
Connection by OBDII for reading (you can also read with CB034 or via ABProg - check legacy procedure)
Read and save FBS data procedure:
Personalization procedure:
(You can proceed working in the vehicle via OBDII and internal CAN connection with CB012)
www.abrites.com
Mercedes FBS4 Manager User Manual
2026
61
6.1.2 DSM Personalization without previously saved FBS data
Preparation:
When no original unit is available, or completely damaged and not possible to read, you would need to do the following:
Now set up the donor unit on bench, using ZN030 ABProg programmer and ZN086, details available below.
N.B. Unit activation happens automatically after 100 ignition cycles.
www.abrites.com
Mercedes FBS4 Manager User Manual
2026
6.2 Connections
There are 2 ways you can directly connect to the DSM module:
The ZN086 adapter is soldered onto four points on the PCB (one of which is the lifted pin) and then connected to the ABPROG > the ABPROG is connected to AVDI, and AVDI to your laptop.
Important: The PIN that needs lifting, is specific for each processor, and you need to find that information first. Since there are many variations, you will need to do your own research and get to the processor’s data sheet. The PIN that needs lifting is the “RST” or reset PIN.
62

www.abrites.com
Mercedes FBS4 Manager User Manual
2026
63
6.3 Legacy procedure for DSM
Once all the connections (described below) are done, you can open the FBS4 Manager > select the DSM > read the module.
Original DSM needs to be connected and you need to open the DSM selection of the FBS4 manager, and press the “Save” button. This would read the required data from the DSM and let you save it to a file located on your computer.
Next step is to connect the donor DSM and read the unit (by pressing “info”) and check if everything is in tact. FBS4 Manager > DSM Selection. After that you can proceed with making the unit virgin by pressing the “Virgin” button.
You would now have to press “Personalize“ button, which would ask you to upload the file, previously saved from the original DSM. Once done, you can press the “info” button and check if the unit is personalized and activated. If everything is good, you would only have to do one more thing.
Last step to complete the procedure is to write the VIN of the vehicle into the unit by pressing the “VIN“ button, and a pop-up window will appear where you need to write the correct VIN to the unit.
www.abrites.com
Mercedes FBS4 Manager User Manual
2026
7. ESL (ELV) Repair
64
This functionality is dedicated to resolving a problem with the “ELV Component Fault” of all FBS4 vehicles equipped with an ESL (ELV), which is preventing the vehicle from being started and driven.
The ESL (ELV) module defects due to dirt, overuse or voltage spikes and sticks in its last position -“locked” or “unlocked” and the vehicle cannot be started.
The function will remove the error in the ESL (ELV) and unlock it, and allow the car to start.
N.B. To avoid this problem happening again in the future, some of the defective components in the ESL (ELV) should be repaired/exchanged.
The function is performed with a direct connection to the ESL (ELV) diagnostic line. It can be executed direct in the vehicle or on bench.
Required software license: MN033 – Mercedes-Benz FBS4 Vehicles Electronic Steering Lock Repair
www.abrites.com
Mercedes FBS4 Manager User Manual
2026
65
7.1 Connections
Connection in the vehicle (using Distribution box):
Connection in the vehicle (using CB026):
Connection on bench (using ZN051 Distribution box):
Connection on bench (using CB026):
www.abrites.com
Mercedes FBS4 Manager User Manual
2026
7.2 ESL (ELV) diagrams/pinouts for connection on bench.
Below you can see the 2 types of connectors and their pinouts:
Picture 1 - 3 PIN Connector
Picture 2 - 5 PIN Connector

66

www.abrites.com
Mercedes FBS4 Manager User Manual
2026
67
7.3 Procedure Execution
When the connection is established, please follow these steps to repair the ESL (ELV):
After performing this procedure, you could start and drive the vehicle. We would suggest getting the vehicle in the workshop, cleaning and repairing the defective parts in the ESL (ELV).
Video 1: https://www.youtube.com/watch?v=YSzF7eu7bTQ
Video 2: https://www.youtube.com/watch?v=7hXThRq1kHY
www.abrites.com
Mercedes FBS4 Manager User Manual
2026
EIS selection > info > gives the identification of the module and information is the unit is personalized, activated, and if the engine start is enabled
Car Key selection > info > identification of the unit, number of keys programmed to the vehicle
8.1 ECU Recovery procedure
In case you need to recover your Engine Control Unit you can follow these steps:
To restore: be aware what you need to restore and press “Program”
*For details, please check the dedicated video in AVDI Fan YouTube Page.
8 More functionalities of the FBS4 Manger
68

www.abrites.com
Mercedes FBS4 Manager User Manual
2026
9. Battery Unlock / Reset for Mercedes-Benz Vehicles Manger
This function enables unlocking/resetting batteries in Mercedes-Benz vehicles, including Mild Hybrid,
Plug-in Hybrid, and Electric Vehicles (EVs).
It also allows reading and clearing Diagnostic Trouble Codes (DTCs) stored in the battery modules, provided that the faults are not permanent.
9.1 Connection Methods
9.1.1 Connection via OBD II Port (In-Vehicle)
1.Connect the AVDI interface to the vehicle’s OBD II diagnostic port.
2.Open the FBS4Manager software.
3.Select the appropriate control unit.
4.4.Proceed with the Unlock/Reset procedure.
69
www.abrites.com
Mercedes FBS4 Manager User Manual
2026
9.1.2 On-Bench Connections:
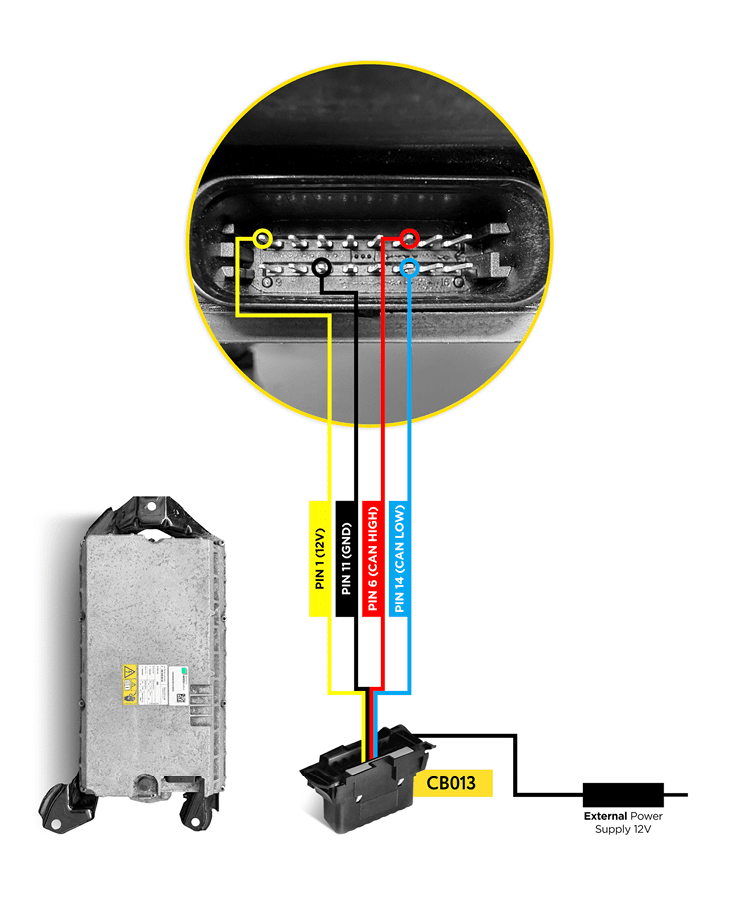
BMS222MH :
CB013 Cable – required for connection to BMS units
70
www.abrites.com
Mercedes FBS4 Manager User Manual
2026
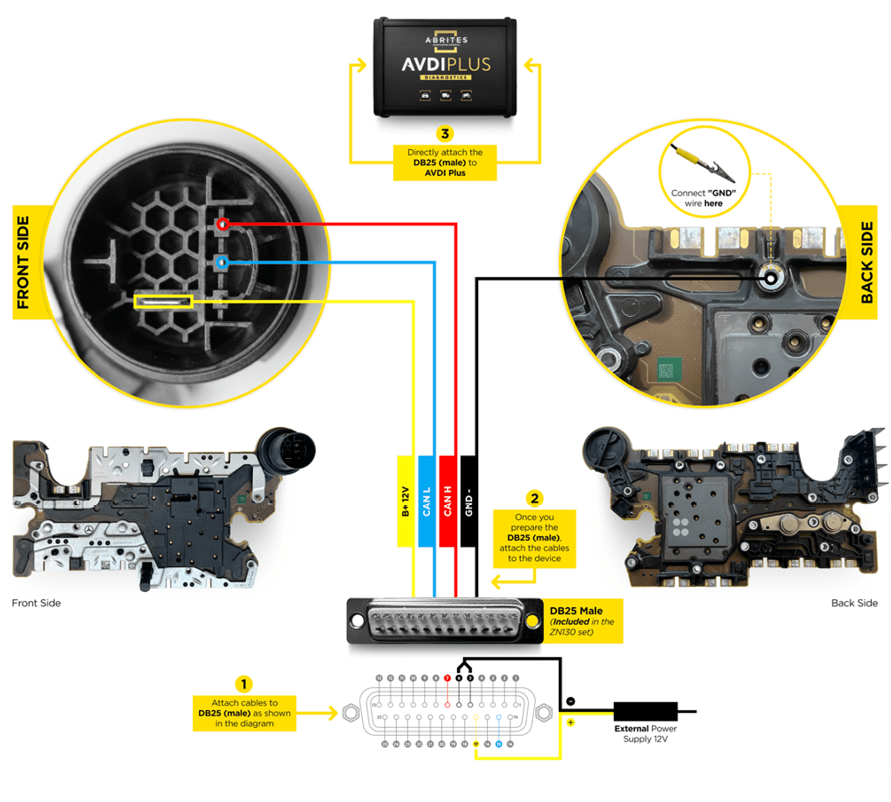
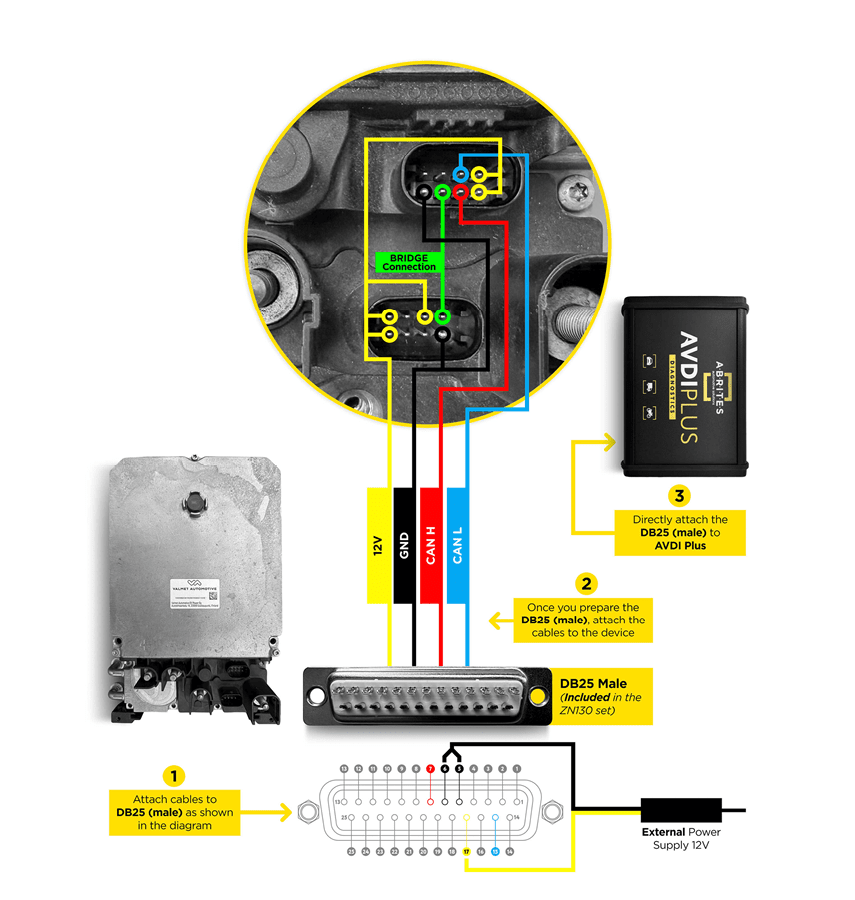
LIB48_222 Module
DB25 (Male) Connector – required for LIB48 modules
71
www.abrites.com
Mercedes FBS4 Manager User Manual
2026
72
9.2 Procedure steps :
1.Establish a proper connection to the selected unit (OBD II or on-bench).
2.Launch the FBS4Manager software.
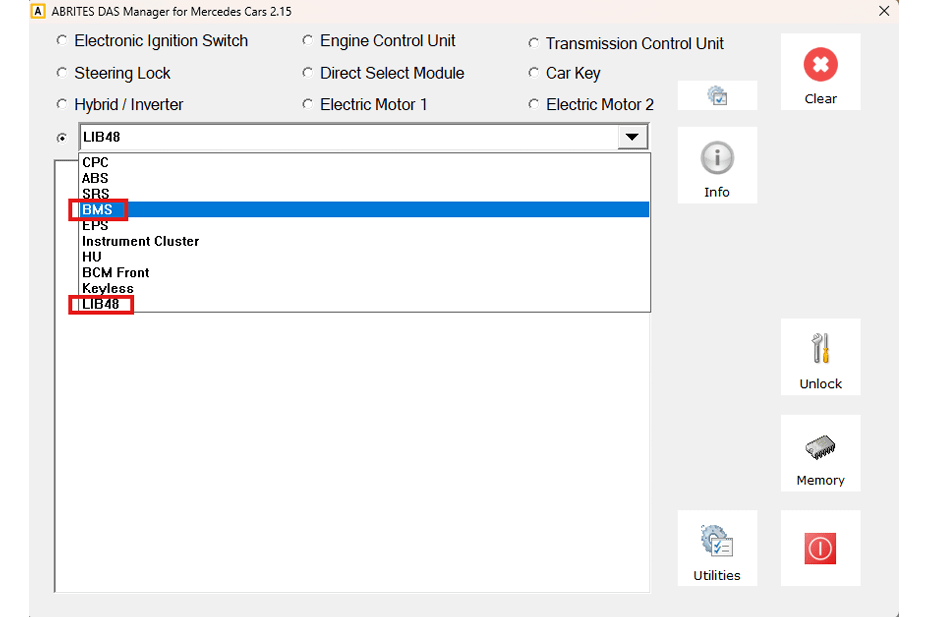
3.Select the correct unit type from the dropdown menu.
4.Click the “Info” button to retrieve unit information and battery status.
5.Press the “Unlock” button to perform the unlock/reset procedure.
Important : After retrieving unit information, always verify the battery voltage.
If the module voltage is below 36V, the battery must be charged externally before proceeding.
When charging is required, the battery module should be disassembled.