

Abrites Diagnostics for Toyota/Lexus/Scion User Manual

Abrites Diagnostics
for Toyota/Lexus/Scion


User manual
version 2.8
www.abrites.com
www.abrites.com
Important notes
Warranty
The Abrites software and hardware products are developed, designed and manufactured by Abrites Ltd. During the production process we comply to all safety and quality regulations and standards, aiming at highest production quality. The Abrites hardware and software products are designed to build a coherent ecosystem, which effectively solves a wide range of vehicle-related tasks, such as:
All software and hardware products by Abrites Ltd. are copyrighted. Permission is granted to copy Abrites software files for your own back-up purposes only. Should you wish to copy this manual or parts of it, you are granted permission only in case it is used with Abrites products, has “Abrites Ltd.” written on all copies, and is used for actions that comply to respective local law and regulations.
You, as a purchaser of Abrites hardware products, are entitled of a two-year warranty. If the hardware product you have purchased has been properly connected, and used according to its respective instructions, it should function correctly. In case the product does not function as expected, you are able to claim warranty within the stated terms. Abrites Ltd. is entitled to require evidence of the defect or malfunction, upon which the decision to repair or substitute the product shall be made.
There are certain conditions, upon which the warranty cannot be applied. The warranty shall not apply to damages and defects caused by natural disaster, misuse, improper use, unusual use, negligence, failure to observe the instructions for use issued by Abrites, modifications of the device, repair works performed by unauthorized persons. For example, when the damage of the hardware has occurred due to incompatible electricity supply, mechanical or water damage, as well as fire, flood or thunder storm, the warranty does not apply.
Each warranty claim is inspected individually by our team and the decision is based upon thorough case consideration.
Read the full hardware warranty terms on our website.
Abrites Diagnostics for Toyota/Lexus/Scion User Manual
2
www.abrites.com
Copyright information
Safety information
Copyright:
Notices:
The Abrites products are to be used by trained and experienced users in diagnostics and reprogramming of vehicles and equipment. The user is assumed to have a good understanding of vehicle electronic systems, as well as potential hazards while working around vehicles. There are numerous safety situations that cannot be foreseen, thus we recommend that the user read and follow all safety messages in the available manual, on all equipment they use, including vehicle manuals, as well as internal shop documents and operating procedures.
Some important points:
Block all wheels of the vehicle when testing. Be cautious when working around electricity.
In case any technical difficulties occur, please contact the
Abrites Support Team by email at support@abrites.com.
Abrites Diagnostics for Toyota/Lexus/Scion User Manual
3
Table of contents
www.abrites.com

Abrites Diagnostics for Toyota/Lexus/Scion User Manual
4
2. Vehicle diagnostics with Abrites for Toyota
5. SPECIAL FUNCTION “KEY LEARNING”
6. SPECIAL FUNCTION “TRANSPONDER TOOL”
6.1 Identification of a key or transponder
6.2 Cloning of a key or transponder
6.3 Preparation of transponders/keys ready for usage with the vehicle
6.4 Preparation of a key by dump of immobilizer or smart system of the vehicle
7. SPECIAL FUNCTION “ECU LASHER”
8. SPECIAL FUNCTION “DUMP TOOL”
9. SPECIAL FUNCTION “ID-BOX RESET”
www.abrites.com
Abrites Diagnostics for Toyota/Lexus/Scion User Manual
List of revisions
Date
Chapter
Description
Revision
27.08.2010
1.0
ALL
First version of
the document.
Update/ Universal 4c key description added, procedures for smart keys
Using the ZN039-2 hardware to perform key learning
Revision of the document + Toyota H immobox key learning procedures
Additional information regarding the usage of ZN067 cable
ID-Box reset including 2018+ vehicles
Smart system replacement for 2017+ vehicles (DST AES/HITAG AES keys)
Key Learning for Corolla/Camry 2018+
Remote/Keyless part programming for 2003-2009 models
01.10.2015
2.1
07.03.2016
2.2
5
04.03.2020
2.3
5
10.10.2020
2.4
5
11.03.2021
2.5
9
11.03.2021
26.11.2021
2.5
2.7
10
5.1
18.08.2021
2.6
APPENDIX
5
28.06.2023
5.1
Remove a section, information available in Toyota Online User Manual
2.8
www.abrites.com
Abrites Diagnostics for Toyota/Lexus/Scion User Manual
1. Introduction
6
Congratulations on choosing our wonderful product!
“Abrites Diagnostics for Toyota/Lexus/Scion” is a Windows PC based diagnostic software for Toyota,
Lexus and Scion vehicles. With the help of this software you can perform complete diagnostic operations of all vehicles. For proper operation of your diagnostic software you will need a corresponding interface for connection between your PC and vehicle named “AVDI”. AVDI is an interface produced by Abrites Ltd. intended to act as an interface between the PC and the electronic control units.
AVDI should be used with ABRITES software produced by Abrites Ltd.
ABRITES is a trade mark of Abrites Ltd
www.abrites.com
Abrites Diagnostics for Toyota/Lexus/Scion User Manual
2.1 Scope of the manual
This document describes the usage of Abrites Diagnostics for Toyota / Lexus / Scion. The document is applicable for the software versions 9.3 or newer. In this manual we suppose that software for your AVDI interface is already installed. Please refer “AVDI Common User’s Manual” in case it is not.
System requirements:
(recommended 4GB)
2. Vehicle diagnostics with Abrites for Toyota
7
www.abrites.com
Abrites Diagnostics for Toyota/Lexus/Scion User Manual
2.2 Getting Started
You can start Abrites Diagnostics for Toyota/Lexus/Scion by starting the Abrites Quick Start application and selecting Toyota, Lexus or Scion.
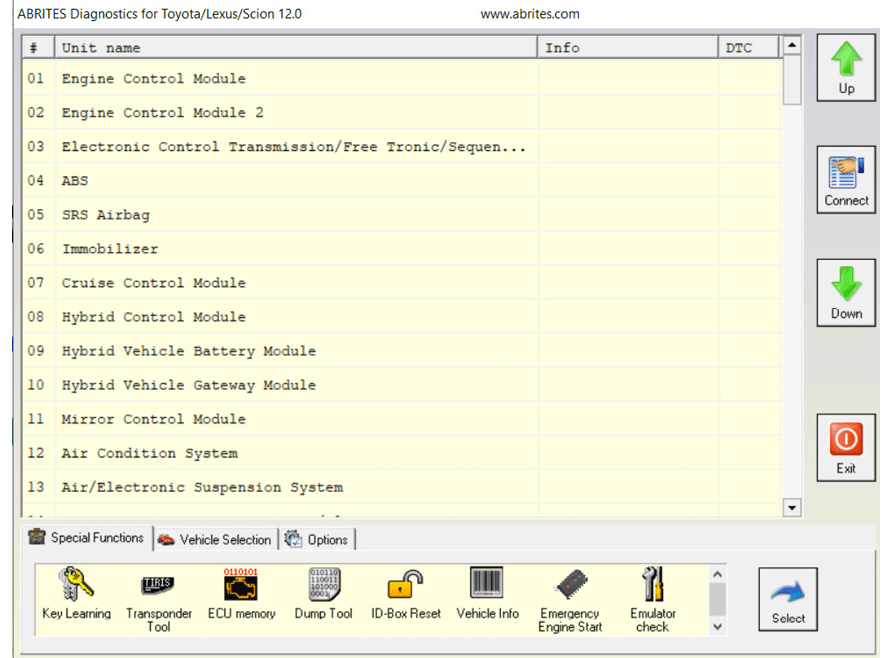
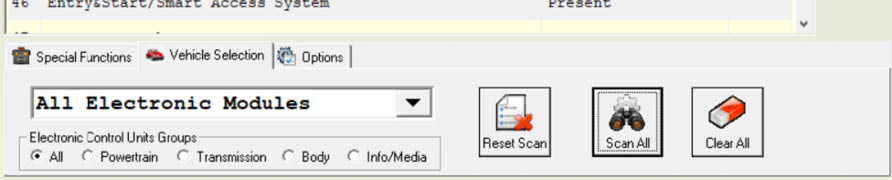
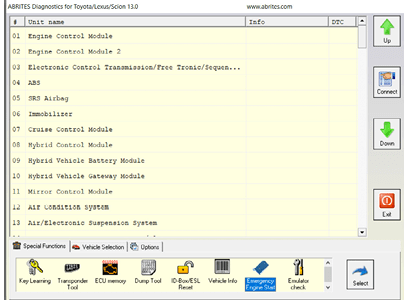
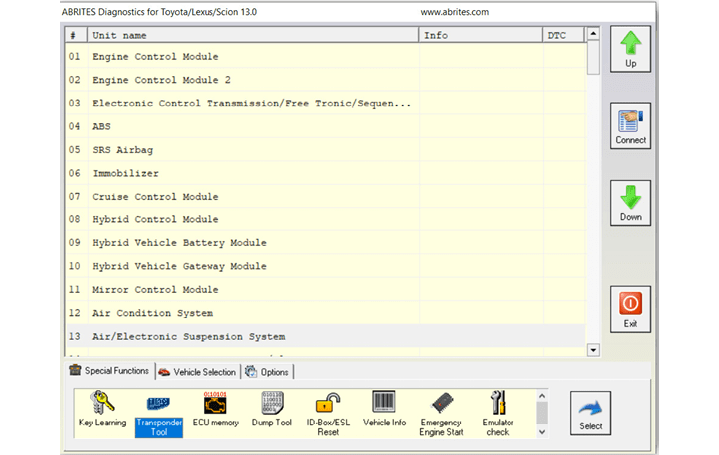
When the diagnostic application is started the main screen of the application will appear
The screen is divided in two parts – the upper part where all electronic control units assembled in Toyota, Lexus or Scion vehicles are listed and the lower part of the screen where the additional special functionalities available in your diagnostic software are listed.
The lower part of the main screen can be used for selection of a vehicle model and group of electronic control units displayed in the upper part of the main screen.
Displayed functionality on the lower part of the screen can be exchanged by pressing the Special Functions or Vehicle Selection options.
8
www.abrites.com
Abrites Diagnostics for Toyota/Lexus/Scion User Manual
3. BASIC DIAGNOSTICS
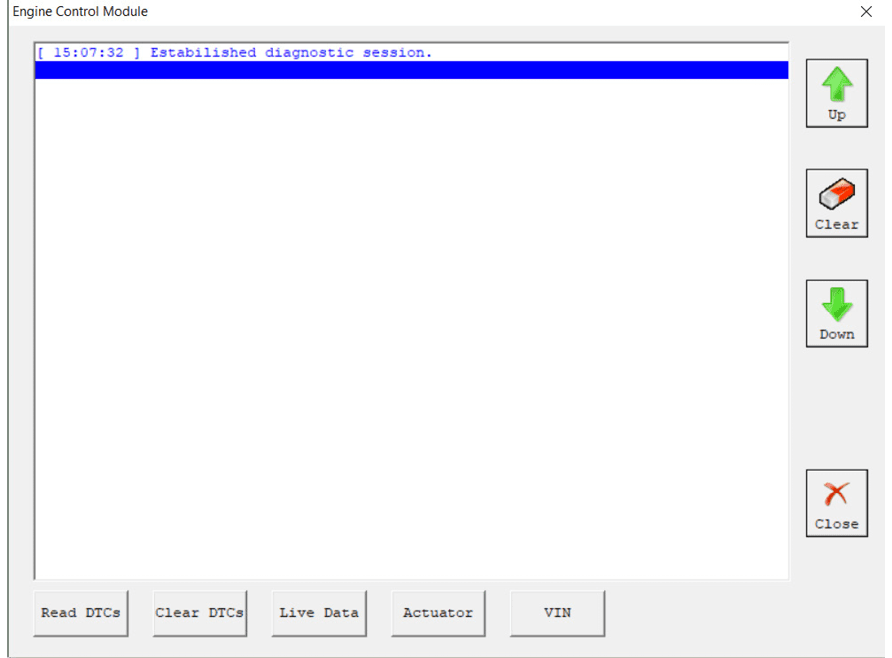
As described you can establish a diagnostic session with most electronic control units in the vehicle.
When the diagnostic session is established the basic diagnostic screen will appear.
If for some reason the diagnostic session can not be established you will be notified.
In the basic diagnostic screen you have a choice to read registered DTCs, clear them, display live data or to perform other actions from the “Special” button.
9
www.abrites.com
Abrites Diagnostics for Toyota/Lexus/Scion User Manual
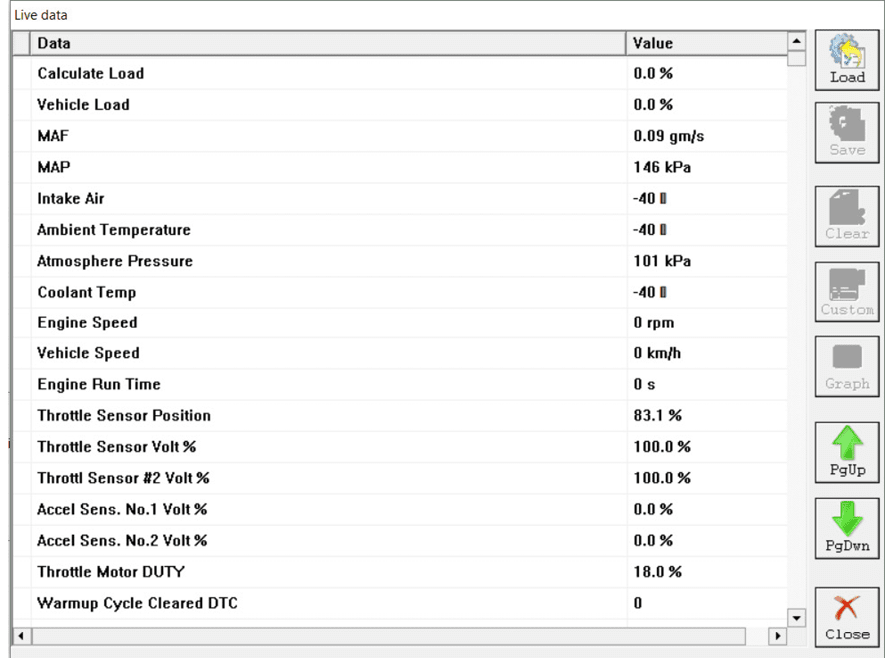
Live data or so named measured values is data sampled by the electronic control units giving us a detailed view of the current status of the corresponding unit.
Simply press the “Live Data” button and everything available from the current unit will be displayed
A list with the units where live data is available is present in appendix A.
Your diagnostic tool can provide you with a wide range of additional special diagnostic procedures available by pressing the button “Special”.
In the appendix “B” a list of currently available special functions depends selected unit is present.
10
www.abrites.com
Abrites Diagnostics for Toyota/Lexus/Scion User Manual
By selecting the  tab placed on the main screen of your Abrites Diagnostics for Toyota/Lexus/Scion you will have an option to select the exact model of your vehicle or group of electronic control units. These options are useful to you because they will reduce the amount of displayed electronic control units on the screen. Additionally this amount can be reduced by clarification of control unit purpose group – power train, transmission, body and infotainment.
Once the set of displayed units is defined you can perform the following actions for the units on the list:


11
www.abrites.com
Abrites Diagnostics for Toyota/Lexus/Scion User Manual

The ABRITES Diagnostics for Toyot a/Lexus/ Scion has some unique diagnosti capabilities, which are not supported by other diagnostic tools. These functions are accessible from the  tab on the main screen.
Please, note that depending on the version you have purchased some of these functions may not be available in your configuration. In this case a message will inform you that you need to acquire an additional license.
4. SPECIAL FUNCTIONS
12
www.abrites.com
Abrites Diagnostics for Toyota/Lexus/Scion User Manual
5. SPECIAL FUNCTION “KEY LEARNING”
13
Important: Key Learning functionalitiies for vehicles produced after 2018 and equipped with smart systems are explained in the Toyota Online User Manual
When the “Key learning” special function is selected it is very important to follow the exact directions of the application.
This function will automatically recognize one of the following types of anti theft systems used in your vehicle:
You will also be asked about existing working keys. If similar master keys are not available you will have an option to reset immobilizer or smart module and to set it in “after sale” mode.
In any case if you have an existing working master key for this vehicle the following programming of new keys will be available without the need to reset the anti theft system.
Please take into account that this function is related only to the transponder part of the key. If you need to program a remote control you should use the main diagnostic screen, to enter the“Main Body” control unit and to press the button “Special”.
Important:
www.abrites.com
Abrites Diagnostics for Toyota/Lexus/Scion User Manual
This immobilizer system uses 4C transponder (or TPX1 for emulation).
Used in cars until 2003/2004.
There are two key programming options:
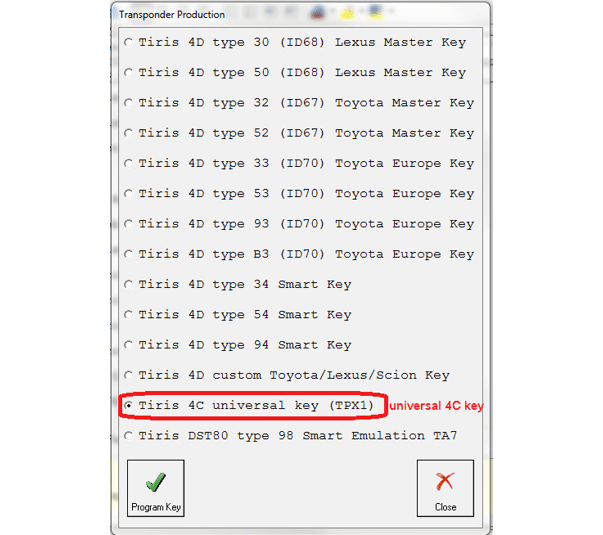
In case you are using a TPX1 transponder, it should be prepared as Tiris 4C universal key (TPX1) from Transponder Tool > Production > Tiris 4C/4D > Tiris 4C universal key (TPX1).
TPX1 is an emulator of the 4C transponder and it is used fro cloning of a 4C transponder
The 4C transponder should not be prepared before programming as it has an ID which is written into the immobilizer during the key programming procedure.
Separate immobilizer control unit (immobox) synchronized with the engine control
module (4C transponder):
This immobilizer system uses 4C transponder(or TPX1 for emulation). There are two key programming options:
In case you are using a TPX1 transponder, it should be prepared as Tiris 4C universal key (TPX1) from Transponder Tool > Production > Tiris 4C/4D > Tiris 4C universal key (TPX1).
TPX1 is an emulator of the 4C transponder and it is used for cloning of a 4C transponder
The 4C transponder should not be prepared before programming as it has an ID which is written into the immobilizer during the key programming procedure.
Immobilizer system integrated in the engine controlmodule (4C transponder):
14
www.abrites.com
Abrites Diagnostics for Toyota/Lexus/Scion User Manual
15
Separate immobilizer control units (immobox) using a 4D transponder:
These immobilizer systems use 4D transponder. Used in 2002-2009 cars but still used in some US car models.
There are two key programming options:
Before programming the transponder it should be prepared as ID67, ID70 etc. from the Transponder Tool > Production > 4C/4D menu.
The 4D transponder could be emulated on DST80 transponder (page 3 writable), TPX2 transponder or TA36 Abrites key.
Separate immobilizer control unit (immobox) Tokai Rika (G-type key (80bit/DST80)):
These immobilizer systems use G-type key(DST80).
There are three key programming options (adding a key, all keys lost, cloning of a key):
Key programming via OBDII - all you need to do is to open the Key learning special function, let the software identify the immobilizer and follow the on-screen messages. If all keys are lost you could use a TPX1
transponder and place it into the PROTAG programmer when requested by the software.
Key programming by dump - read the EEPROM memory of the immobilizer using the ABPROG software > program then a transponder using the Transponder Tool special function > Transponder by dump > load the EEPROM dump and program the transponder. Once the transponder is programmed you could write the new dump to the EERPOM memory using the ABPROG software.
Before programming the transponder it should be prepared as DST type 36,37,56,57,93, 97, 98 from the Transponder Tool > Production > DST80/DST+ menu.
It is possible to use a TA36 Abrites key.
www.abrites.com
Abrites Diagnostics for Toyota/Lexus/Scion User Manual
16
Some of the immobilizer control units are reset after 15 minutes or more, it depends on the software version not on the part number of the unit.
After immobilizer reset the unit is in Auto key learning state and it could remain in that state until 2 or more key are programmed. We can try exiting the Auto key learning state by depressing the brake pedal 5 times.
A DST80 transponder could be prepared only once.
Separate immobilizer control unit (immobox) Tokai Rika (H-type key (128bit/DST AES)):
These immobilizer systems use H-type key (DST AES).
You can find three different immobox types:
Here are the key programming options:
For adding a key we need to have a working key and a used or new key. If you use a new key it has to be prepared prior to starting the procedure.
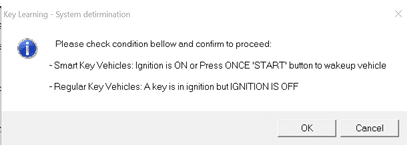
Once we start the software and begin the key programming procedure we receive a message to put the car in ignition ON. We do this and move to the next step The software will then ask us whether we would like to reset the module (this is done ONLY when all keys are lost).
Abrites Diagnostics for Toyota will then ask us to turn the ignition ON using a working key.
This is exactly what we are to do. Bare in mind the following specifics depending on the different equipment of the vehicles:
1. For cars equipped with “Key in switch” we only place the new key in the key slot and we do not turn the ignition to the ON position.
2. For cars not equipped with “Key in switch” we turn the new key to the ON position.
We can then add another key or store the current key and exit the procedure. We can use new keys, used keys or the Abrites TA30 key.
1. We start by performing a reset of the immobilizer because after resetting we can add keys.
2. If this does not work we move to sniffing the communication with Abrites ZN068 Abrites adapter for Toyota H
3. Internal connection of fuses and key switch
www.abrites.com
Abrites Diagnostics for Toyota/Lexus/Scion User Manual
17
We DO NOT need to know the exact immobilizer generations. Abrites diagnostics for Toyota will detect the three types. It will try to detect them in the following order:
1st Generation US market vehicles.
1st Generation EU market vehicles.
2nd Generation
We MUST NOT stop the software, unplug the USB or the PC under any circumstances because we will need to restart the whole procedure including all the preparation we have undergone.
1st Generation US market can be reset. Systems of this type can be reset even if no master key is available.
We need to start the Abrites diagnostics for Toyota and when we see the message for reset. We then select “Yes”. The software will then show us a message to turn ignition OFF but keep the key in the key slot.
In 15-30 minutes we we will see a message from the software saying that the IMMO is successfully reset. After that the car is in “Auto learning mode”. This means that the first key you turn the ignition ON with will be programmed.
If the software is unable to reset the IMMO you will receive a message within the first 30 seconds. This means that the car is probably equipped with an H chip. The Abrites diagnostics for Toyota will try 1st Generation Toyota EU.
1st Generation Toyota EU starts by a message requesting the car to be in the ignition ON and the ZN068 Abrites adapter for Toyota H needs to be placed near the antenna for 30 seconds. If this is the IMMO we have this means that we can prepare the sniffer as a master key. Once that is done we can enter key programming (we already have a master key).
If the car is not 1st Generation we get a message that the sniffs were not enough and we attach the ZN068 Abrites adapter for Toyota H and continue .
Under NO circumstances should we stop the procedure or take out the USB, stop the PC, etc.
If we do this we MUST start the whole procedure over again.
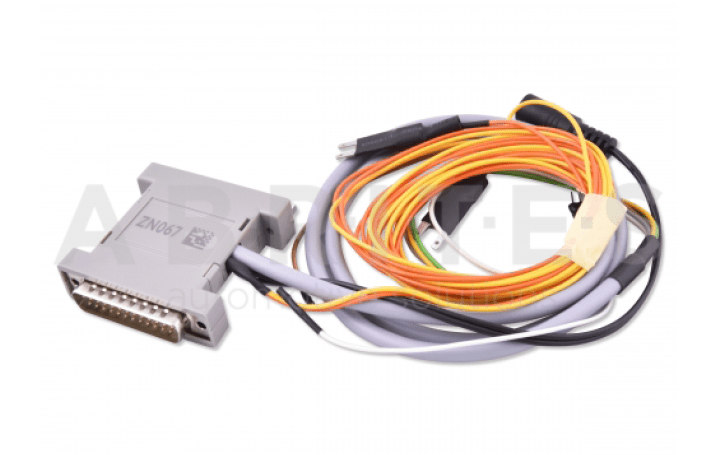
We then connect the ZN067 to the AVDI and we start looking for the fuses for the IMMO – Battery fuse, ignition fuse and key in switch fuse (we need to have a wiring diagram available for the particular model we are working with). Good practice advise: Check the live data if you do not know what is what and see if by removing a certain fuse you see the live values for what you need as inactive.
It is hard, the fuses are different, and we need to pay special attention when dealing with these cases.
We need to always confirm all of our connections, If we have made an error somewhere the software will notify us and we need to go over our steps once more to confirm.
www.abrites.com
Abrites Diagnostics for Toyota/Lexus/Scion User Manual
18
Once all is confirmed as OK the software will start a reset. This takes up to 30 minutes (in most cases you we need to wait around 5-6 minutes). Once this process ends the ZN068 Abrites adapter for Toyota H will beep five times and the software will say that the secret key is found and attach the sniffer. This is exactly what we do and then we press the button to prepare it as a master key for this vehicle.
The next message will ask us to return all the fuses to their original places as well as the key in switch. We do that if we have one and then we turn the ignition ON.
We are now done with the hard part of the procedure. You just need to know that the ZN068 Abrites adapter for Toyota H will be a master until we disconnect the AVDI or the ZN068 Abrites adapter for Toyota H. Until we do that we can program keys with it or use it to start the car.
After we turn the ignition ON the software automatically enters key programming. The procedure is once again dependent on the type of equipment you have. You can use basically any key – new, used or the TA30 Abrites key
Once we have programmed the keys, we can go into module 6 by diagnostics and we can delete the previously programmed keys (in case the customer has lost them and is afraid they can be found by someone else). This may not work 100% for all models but they are being added as we upgrade the versions of the Abrites Diagnostics for Toyota.
Keep in mind that the ZN068 Abrites adapter for Toyota H and TA30 are reusable and you do not need to buy a separate sniffer for each car you do.
Here are some examples for connection to the battery and ignition fuses:
Toyota Hilux 2015-2017
Battery fuse - 10A ECU-B NO.2
Ignition fuse - 5A IG2 NO.3
Key switch present (pin 3)
AyGo 2014-2020
Battery fuse - 7.5A AM2 NO.2
Ignition fuse - 5A IG2 NO.2
Key switch not present
Corolla/Auris 2011-2014 / 2018-2020
Battery fuse - 10A ECU-B NO.2(Except 1WW)
10A ECU-B2(1WW)
Ignition fuse - 7.5A IGN
www.abrites.com
Abrites Diagnostics for Toyota/Lexus/Scion User Manual
Additional information regarding the usage of the ZN067 cable and identifying the correct fuses needed based on best practices.
We know looking for the correct fuses for the Toyota ZN067 procedure can prove difficult. For this reason we suggest to always use the factory wiring diagrams, however this is not always possible when working on
a car.
Based on our practice we have found a way to look for the correct fuses where you can connect and know they are 100% the fuses you need to complete the All Keys Lost H type mechanical key procedure. We use live values from Abrites diagnostics for Toyota and we start taking the fuses out one by one.
As you know you need to find the following:
1. Battery (B+)
2. Ignition switch (IG SW)
3. Key switch (KEY SW) – you do not really need to find this as you just disconnect the connector going directly into the ignition switch and connect the appropriate cable from the ZN067 to it. This often involves
removing so plastic part but this is not a problem as there is no alternative solution to AKL situations.
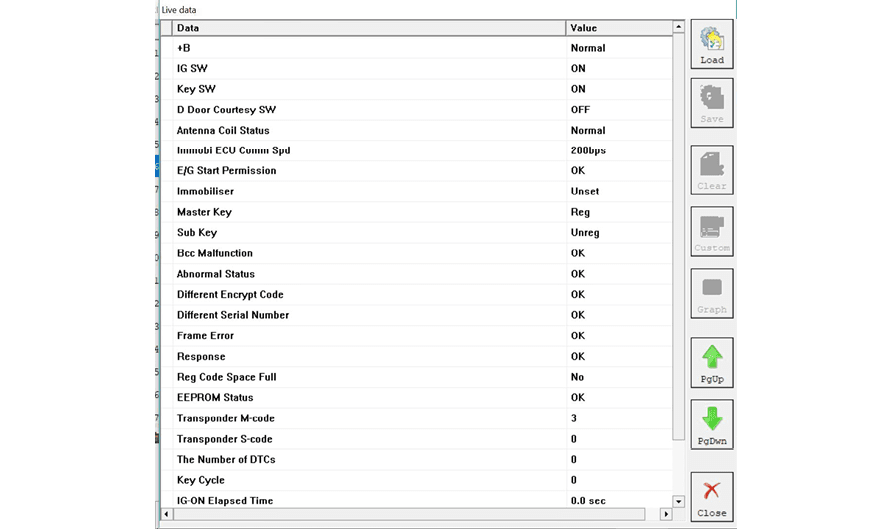
So if you open the diagnostics menu, go to the immobilizer module and press the LIVE DATA button. You will see this screen:
19
www.abrites.com
Abrites Diagnostics for Toyota/Lexus/Scion User Manual
As you can see the value for the +B, IG SW and KEY SW are all stated as NORMAL or ON.
As you start pulling the fuses out you can monitor the live values for these three. Pull a fuse, wait a few second, put the fuse back if you do not see change. Keep doing this until they are disabled and you know you have your correct fuse. Another very useful thing to note is that the correct fuses are almost always the same size as the ones on the ZN067 and usually vary from 10A to 20A so there is no point in going through large fuses. Once you find your needed fuse you will see that the value for +B, IG SW or KEY SW changes from a positive value (for example ON) to a negative (for example OFF).
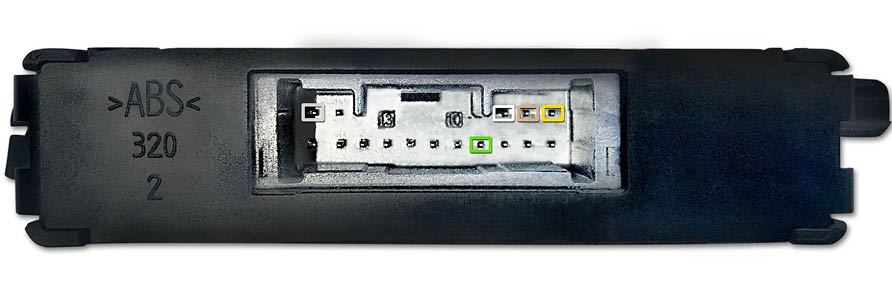
Just as a reminder we would like to remind you that the YELLOW cable goes to the B+ and the ORANGE cable goes to the IG SW. The smaller cable is destined for the KEY SW.
In order to assure that we are always working with the correct fuses we need to keep in mind that the there are sometimes more than one fuse for B+ and/ or IGN.
If the car you are working on has more than one fuse - please make sure to always start by finding the fuse with the lower amperage value.
Example: you have 2 fuses for B+, one is 15A and the other is 5A. In this situation ALWAYS try the 5A fuse first.
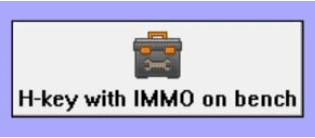
Key programming on bench
For this procedure you will need to follow the on-screen messages and connect to the immobilizer unit using the Abrites ZN067 Abrites adapter for Toyota H. Please use transponder tool to enter “H” keys
Here is the connection diagram for bench reading with ZN067 adapter:
20
www.abrites.com
Abrites Diagnostics for Toyota/Lexus/Scion User Manual
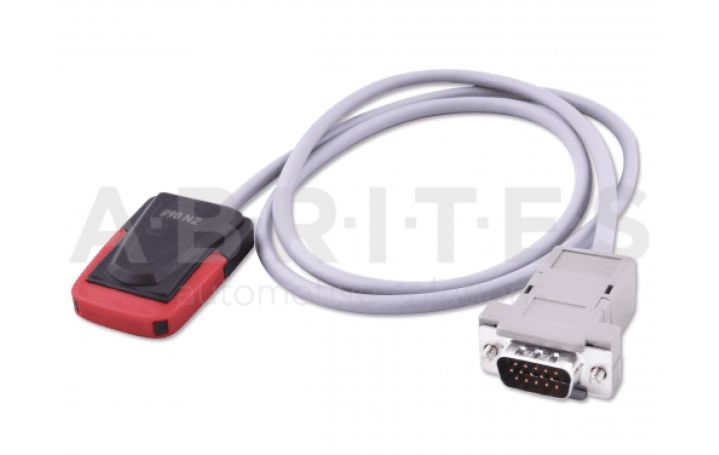
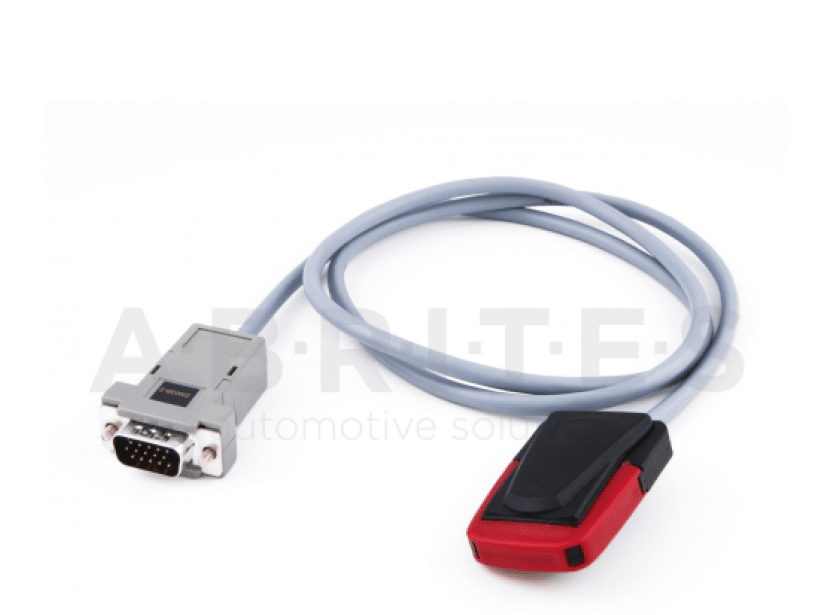
ZN067 Toyota mechanical key (H-type) adapter
ZN068 Toyota mechanical key (H-type) adapter
Cloning a key
For cloning a key we ONLY need the working key itself and not the whole car. It is done through the Transponder Tool special function > Cloner.
You will need a PROTAG programmer. You can only clone a key over a TA30 transponder.
21
www.abrites.com
Abrites Diagnostics for Toyota/Lexus/Scion User Manual
The Abrites ZN039-2 adapter is the new tool designed by Abrites to perform key learning on all Toyota Smart key vehicles. It is used to emulate a master key when no master key is present so as to perform key learning on the vehicles. With the help of this tool you no longer need to take the car apart, take out the Smart system, read the EEPROM, load into the transponder tool and make a Master key. Instead you can emulate a master key and add another to the vehicle.
Using the ZN039-2 hardware to perform key
learning (smart systems)
22
www.abrites.com
www.abrites.com
Abrites Diagnostics for Toyota/Lexus/Scion User Manual
1. Press “Key learning” special function and follow the instructions:
The ZN039-2 will be accepted as a Master key and you can continue to learn a new slave key and reuse your ZN039-2 adapter in the future.
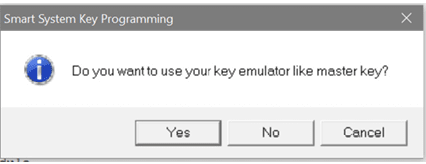
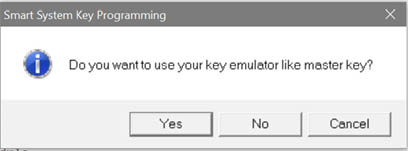
3. Here choose that you want to use the ZN039 as a MASTER KEY EMULATOR
4. Simply follow the instructions.
2. Turn the ignition ON and continue:
23
23
www.abrites.com
www.abrites.com
Abrites Diagnostics for Toyota/Lexus/Scion User Manual
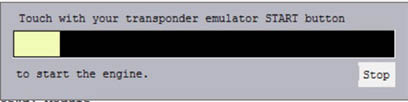
After that the car will start with your ZN039-2 Emulator. And you can drive it to a workshop where you can perform key learning.
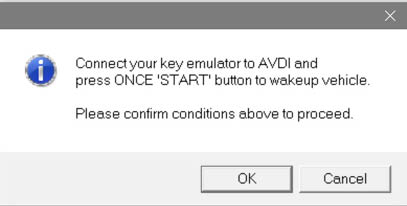
Here you need to select the “Emergency start” special function:
Turn the ignition ON.
Confirm that you want to use the Emulator as a master key.
From then on follow the instructions:
Using the ZN039-2 adapter as an EMERGENCY START tool for Toyota/Lexus/ Scion/Subaru Smart access cars.
24
24
www.abrites.com
Abrites Diagnostics for Toyota/Lexus/Scion User Manual
25
IMMOBILIZER modules replacement:
In order to be able to perform immobilizer parts replacement you need to have a working key which we need to confirm via the live data on the immo module if we cannot verify in another way i.e. start the car.
ECU exchange:
We need to place a new or used ECU of the required type in the car and put the ignition ON. We then need to short out the OBD pins which we need to check according to the specific car. 30 minutes later we will have full light mode on the cluster and it will start blinking intensively.
Once the 30 minutes are over and we see that we remove the short we have made in the beginning, turn ignition OFF, wait a minute or two and start the car.
IMMO BOX exchange:
For this procedure we do not need a working key, all we need is a replacement (new or used IMMO BOX), we do not need a key for the box itself either. We place the new IMMO box in the car, perform one of the ALL KEYS LOST procedures as per the vehicle you have and then we perform the ECU exchange so as to adapt the IMMO BOX to the ECU.
www.abrites.com
Abrites Diagnostics for Toyota/Lexus/Scion User Manual
6. SPECIAL FUNCTION “TRANSPONDER TOOL”
Before usage of special function “Transponder Tool” please be sure that your PROTAG transponder programmer is connected to your PC.
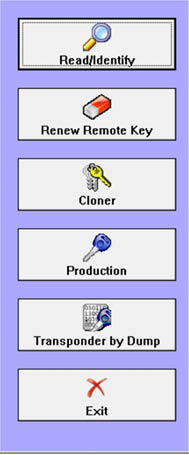
When your PROTAG transponder programmer is detected a list of sub functions will appear – Identification of a key or transponder, Cloning of a key/transponder, Preparation (production) of transponders ready for usage with Toyota/Lexus/Scion vehicles, Programming transponder by the dump of immobilizer/smart system.
Before usage of your programmer please take into account:
26
www.abrites.com
Abrites Diagnostics for Toyota/Lexus/Scion User Manual
27
6.1 Identification of a key or transponder
If you have a key or transponder simply place it near the antenna of the programmer and press the “Read/Identify” button. A message about type of your transponder and content programmed will be displayed . If your transponder is some of the known transponder types information about this type (e.g. Texas Crypto 4D type ID67 – Master) will be displayed .
Abrites Diagnostics for Toyota/Lexus/Scion will try to recognize ONLY transponders/keys used in Toyota/Lexus/Scion vehicles. These types are as follows:
ID67 is intended for usage by Toyota/Scion vehicles.
ID68 is intended for usage by Lexus vehicles.
ID70 is intended for usage by Toyota Europe.
These types of transponders are usually used in the smart systems (keyless keys) and also
regular keys also known as G-chips (G-transponders).
6.2 Cloning of a key or transponder
With the help of this option you can prepare a fully functional cloning of an existing vehicle’s keys. Supported keys/transponders for cloning are:
www.abrites.com
Abrites Diagnostics for Toyota/Lexus/Scion User Manual
28
Important:
Currently “Abrites Diagnostics for Toyota/Lexus/Scion” NOT supports Texas DST+ transponders for cloning. This will be an issue of the next software releases.
6.3 Preparation of transponders/keys ready for usage with the vehicle
Usually when you need to add an additional key to the vehicle or all keys are lost you need to use some kind of key or transponder.
Transponder inside of the key should be with a special content in order for future programming by diagnostics to be possible.
“Production” utility provides the ability to program an empty (brand new) transponder as at transponder ready for acceptance by the immobilizer system of the vehicle.
Transponders applicable for this utility are virgin Texas 4D transponders or TPX2 transponders. Only for preparation of “Emergency 4C” key you will need a TPX1 transponder.
While transponder preparation is in progress you have a choice to select what kind of key you need to prepare – master key or sub key and also for what model vehicle it is intended.
Please take into account that the following rules are applicable for all Toyota/Lexus/Scion vehicles:
We want to point out that in many cases keys ordered from Toyota/Lexus/Scion dealers can not be used after reset of immobilizer system. Reason for this is that these keys in most cases are SLAVE keys and can be used only if an MASTER key has been programmed before. With this utility you can prepare a new Texas 4D transponder as a MASTER key.
Another important issue is that once a transponder is programmed as ID67, ID68 or ID70 it can not be used for second programming i.e. it can not change its type. This is because ID67,ID68 and ID70 transponders are with locked data fields after preparation.
www.abrites.com
Abrites Diagnostics for Toyota/Lexus/Scion User Manual
6.4 Preparation of a key by dump of immobilizer or smart system of the vehicle
This utility will provide the ability to prepare a key when you have the dump of the immobilizer system.
Supported immobilizer systems are:
All that is needed from you is to read by some IC programmer the eeprom of your immobilizer/smart module, to load it in the application, it will automatically identify the type of your vehicle and the needed transponder or key for programming. When the key is programmed with the same IC programmer you can program the new dump (modified by application) in the immobilizer/smart module back.
The generated key will work as a MASTER key so you can proceed to add additional keys by diagnostic.
Important note for Smart Systems:
Generated keys will work as master keys when placed near the START/STOP button of the vehicle.
Their remote control will not work.
To program a fully functional key you should use special function “Key learning” when availability of master key (i.e. without reset of the system, simply “add key”) is selected.
This way for programming does not require access to the ID-box of the vehicle which usually is placed at a very hard to access place.
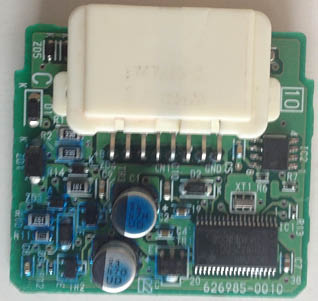
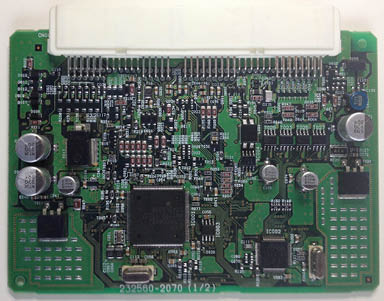
Find bellow pictures of most popular immobilizers and smart systems:
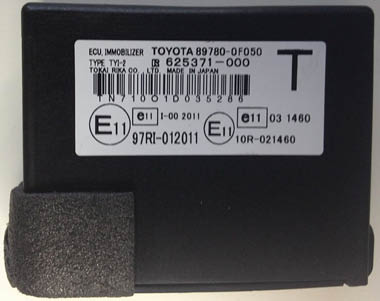

Immobilizer control module
Immobilizer control module Tokai Rika. It is with EEPROM 93C66. Dump is ENCRYPTED!
29
www.abrites.com
www.abrites.com
Abrites Diagnostics for Toyota/Lexus/Scion User Manual
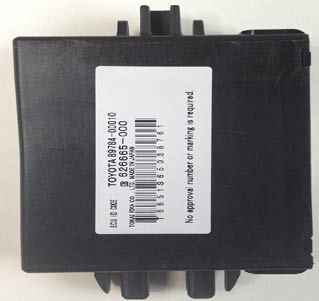
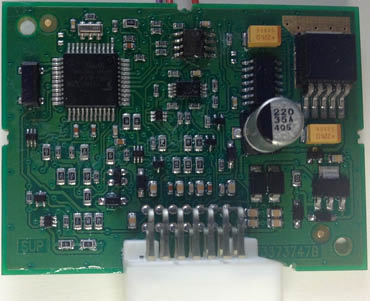
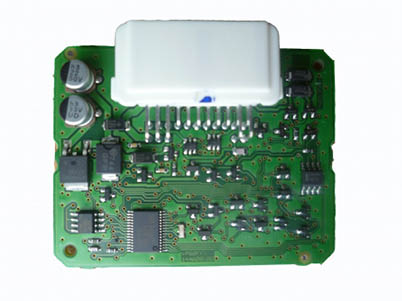
Immobilizer control module Visteon. It is with EEPROM 93C56:
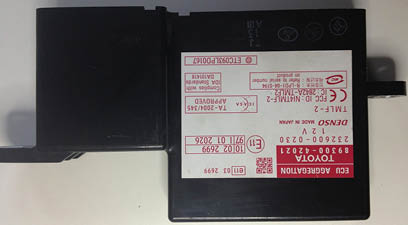
Smart Access Module (so known Certification ECU):
ECU-ID code or ID-Box(with external eeprom):
Immobilizer control module Valeo. It is with EEPROM 24C04:
Smart access module – EEPROM 93C86 or 93C66:
ID-Box with external EEPROM 93C46:
30
30
www.abrites.com
Abrites Diagnostics for Toyota/Lexus/Scion User Manual
This special function is intended for tuning purposes and allows you to read and program flash memories of engine control units produced by BOSCH – types EDC15 and EDC16.
8. SPECIAL FUNCTION “DUMP TOOL”
This special function will help you when the dump of some electronic control unit is present to reset it in virgin state, to adjust mileage or to clear crash data records from airbag control modules.
All that is needed is to select the type of electronic control unit and function, to load corresponding dump and to press button “Parameters”.
Once the dump is modified it should be saved and programmed back in the corresponding control unit.
Refer to Appendix C about available control units and functions available in “Dump Tool”.
9. SPECIAL FUNCTION “ID-BOX RESET”
The “ID-Box” control unit is a part of the immobilizer system in the vehicles with a smart access system (keyless keys). “ID-Box” combines synchronization patterns between Smart Access Module/ESL and Engine Control Electronics.
The ID box’s purpose is to “unite” the communication signals from the above modules.
In many cases the replacement of a Smart Access Module and ECU is linked to the reset of the ID-box module to it’s after sale state (virgin state), this is done in order to allow acceptance of a new part to the vehicle’s security system.
Generally, resetting of the Smart Access Module leads to an internal reset of the IDbox but in many cases a reset of the Smart Access Module by diagnostics is restricted. In these cases we have the option to reset the Smart Access Module and ID-box with the help of the dump tool (for ID-box with an external eeprom).
The Abrites diagnostics for Toyota/Lexus/Scion software also supports the ID-box without an external eeprom (through direct LIN connection only).
The biggest problem is that the disassembliy of an ID-box from a vehicle is a very difficult task. Usually it is placed at a difficult location (in most cases you need to remove the dash board of the vehicle and many other parts).
For this reason we offer the option to reset ID-box by connecting directly to the internal LIN BUS of the car using either the ZN051 Distribution box or a CB012 cable set, Alternatively you can do that using a custom cable for connection between the AVDI and the vehicle:
Pin 1 of the AVDI Interface <-> internal LIN BUS of the car.
7. SPECIAL FUNCTION “ECU LASHER”
31
www.abrites.com
Abrites Diagnostics for Toyota/Lexus/Scion User Manual
All that is needed to do this is:
1. Connect your
or
2. Connect to the OBDII of the car
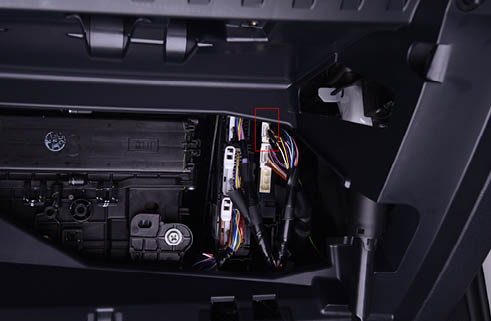
3. Disconnect the two connectors of the smart system (located under the glove box compartment)
4. Connect to the internal LIN BUS (red connector of the CB012, or K1 socket of the ZN051 Distribution box) of the car.
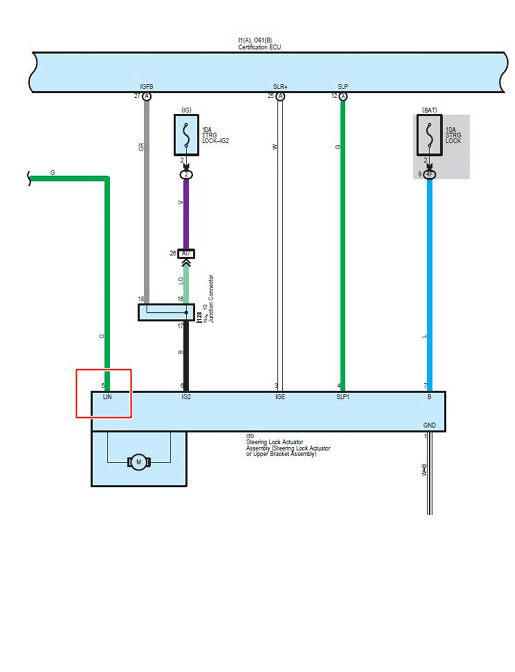
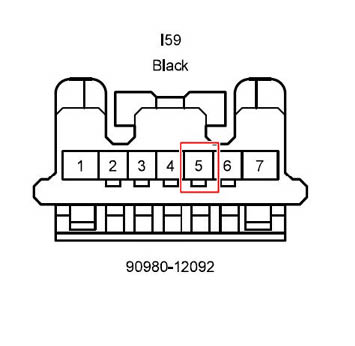
There are two options to connect to the internal LIN BUS of the car:
Option 1: Connect to pin 5 of the ESL (if available) without disconnecting the ESL connector
Here is the connection diagram of the 7-pin ESL:
32
www.abrites.com
Abrites Diagnostics for Toyota/Lexus/Scion User Manual
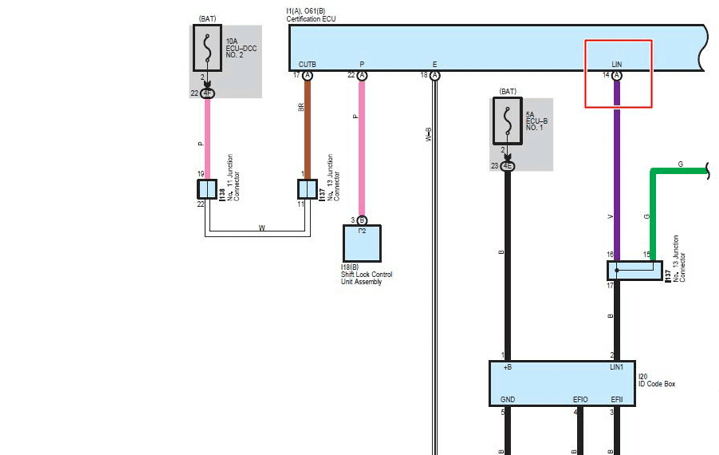
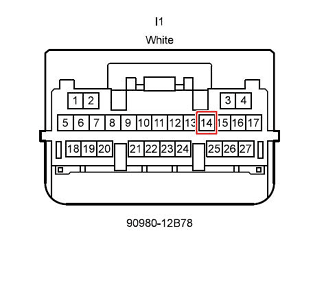
Option 2: Connect to the LIN BUS wire which goes to one of the smart system’s connectors directly (this can be verified in the electrical wiring diagram of the Toyota Factory Repair Manual). The LIN BUS pin/wire depends on the car model and configuration.
Here is an example where pin 14 is the LIN:
If you want to connect to the ID-box on bench for car models 2013+, you should connect to pin 2(LIN) of the ID-box (check the wiring diagram above).
The ID-box of the models before 2013 has 7 pins.
33
www.abrites.com
Abrites Diagnostics for Toyota/Lexus/Scion User Manual
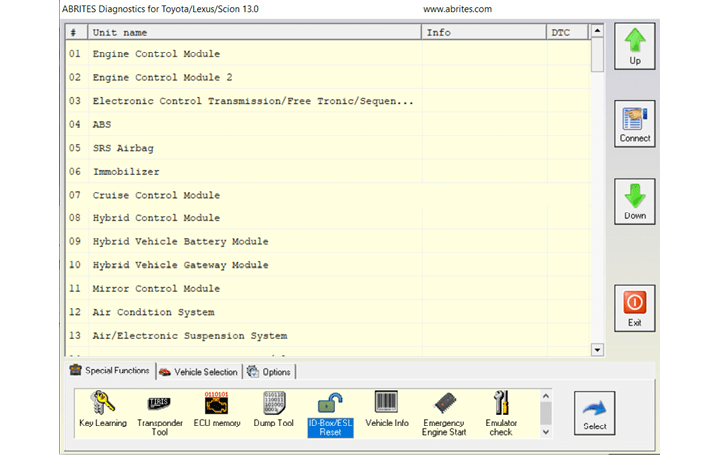
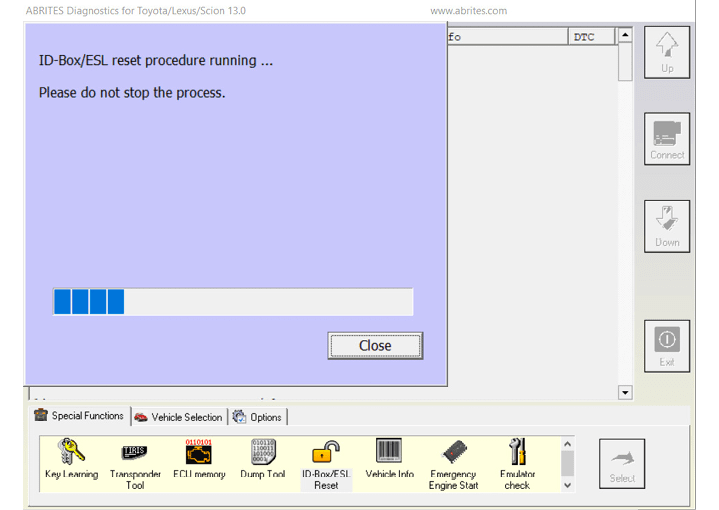
5. Start Abrites Diagnostics for Toyota/Lexus/Scion and select “ID-box reset” special function.
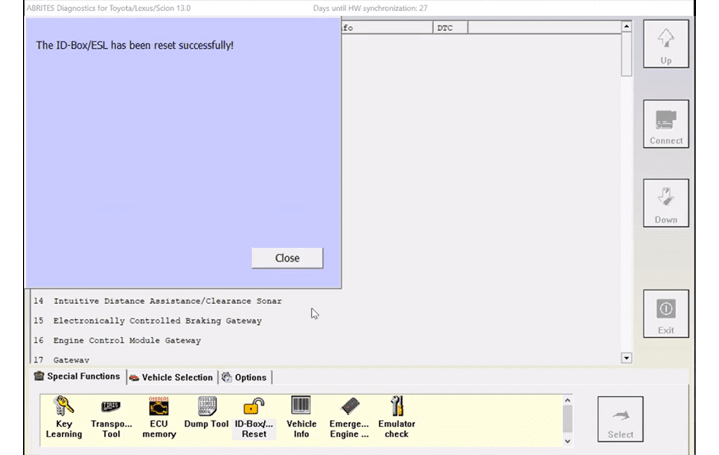
6. Wait until the reset procedure is done. The process will take up to 1 minute.
34

www.abrites.com
Abrites Diagnostics for Toyota/Lexus/Scion User Manual
Important:
Be sure that you really need to reset ID-box module of the vehicle.
For key programming purposes for vehicles up to 2017 this is not needed – you have an option to try to reset of the smart system (together with the ID-box) by diagnostics and if this option is restricted you can program a working master key directly in the dump of smart module or using the ZN039-2 adapter – refer to special function “Key Learning” and “Transponder Tool”. So access to the ID-box is not needed.
35
www.abrites.com
Abrites Diagnostics for Toyota/Lexus/Scion User Manual
The Abrites software for Toyota/Lexus/Scion allows you to replace the smart system/steering lock of the car, including the models produced after 2018 with Hitag AES keys) with both new and used smart systems.
In order to replace the smart system the ID-box must be reset (check chapter 9). Both IDboxes with an external eeprom and without an external eeprom are supported.
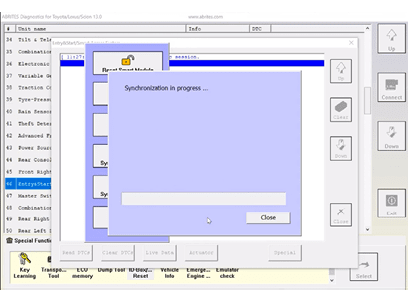
Once the ID-box is reset and a new/used smart system is installed you can start the synchronization procedure.
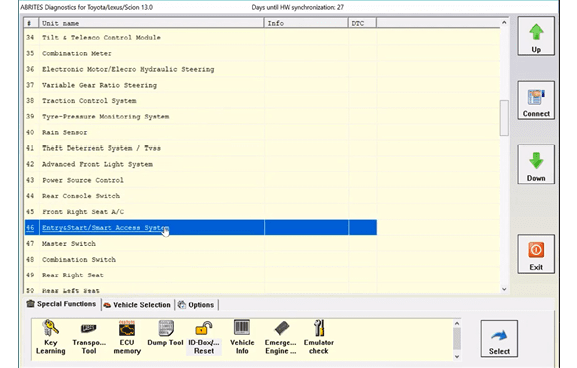
1.Start the Abrites Diagnostics for Toyota/Lexus/Scion and access the Smart System unit (module 46) through the diagnostics menu:
10. SMART SYSTEM REPLACEMENT (DST AES/HITAG AES keys)
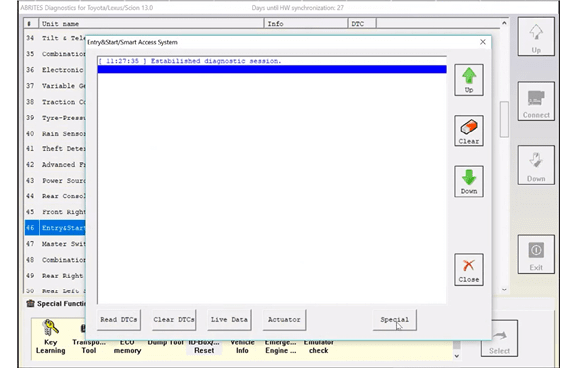
2. Press the “Special” button
36
www.abrites.com
www.abrites.com
Abrites Diagnostics for Toyota/Lexus/Scion User Manual

37
37
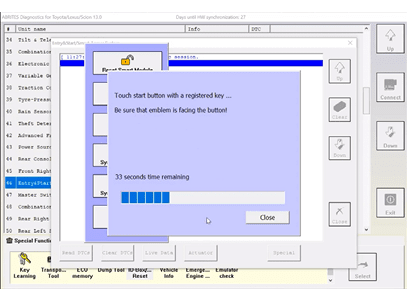
4. Turn IGN ON and press “Next”
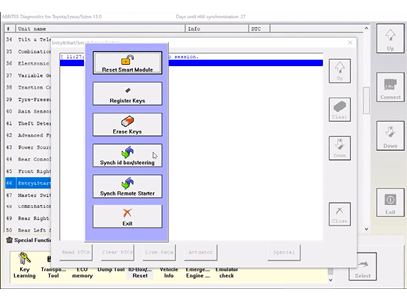
3. Press the “id box/steering” button
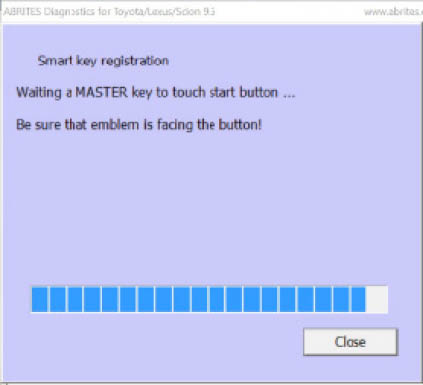
5. Touch the start button with a registered working key with the logo of the key facing towards the start button
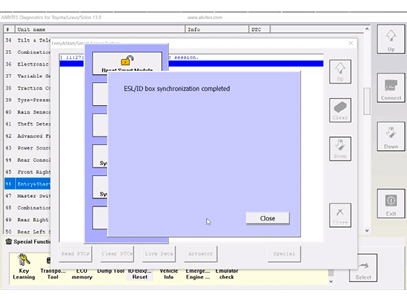
6. The ID-box synchronization procedure is complete and the smart system is successfully
replaced.
www.abrites.com
Abrites Diagnostics for Toyota/Lexus/Scion User Manual
Appendix A – Availability Live Data
APPENDIX
38
ABS control module
Master Switch
Engine Control Module
Rear Right Door
Driver Door Control Module
Rear Console
Hybrid Control Module
Steering Pad
Cruise Control Module
Passenger Door Control Module
Electronic Transmission Control Module
Entry & Smart Access Module
ECB Gateway
Rear Left Door
Immobilizer
CAN bus
Electronic Control Unit
Note
www.abrites.com
Abrites Diagnostics for Toyota/Lexus/Scion User Manual
Appendix B – Special functions available from basic diagnostic session
39
Immobilizer Reset
Smart Module Reset
Remote Key Registration
ECT reset
Throttle Learn
ABS alignment
A/C Servo Motor Init
EMPS Init
Remote Key Deletion
Immobilizer
Entry&Smart Access
Main Body
Engine Control Module
Engine Control Module
ABS
Air-condition
Power Steering
Main Body
Register Key
Steering Lock
Synchronization
ECU Synchronization
Leave After Sale
ABS reset
Gateway reset
Synchronize
Erase Keys
Immobilizer/Smart
Module/ECU
Entry&Smart Access
Entry&Smart Access
Entry&Smart Access
ABS
Gateway
Immobilizer
Immobilizer/Smart
Module/ECU
Registers remote key
Resetting learned values ECT
Resetting learned values ECT
Reset learned values of ABS
Sync steering lock electronic with Smart Access Module
Sync engine control module with Smart Access Module
Cancel auto learning state (key learning) of the engine control module
Reset learned values - should be used if ABS module or YAW rate/G sensor are replaced
Used to reset list with assembled in the vehicle control modules. Useful when some unit have been removed from
vehicle (or added).
Synchronization between
immobilizer and smart unit
Function
Control Unit
Note
www.abrites.com
Abrites Diagnostics for Toyota/Lexus/Scion User Manual
Appendix C – Dump Tool available options
tokai rika eeprom 93C66 (texas 4D)
tokai rika eeprom 93C66 encrypted (texas 4D or G-chip)
valeo 24C04 (texas 4D)
visteon 93C56
40
NOTE: For older model vehicles (those using an external IMMOBILIZER and a 4C type of key) All users are advices to use a universal key (this key can be generated via the production menu). Using this key the user can add a new key without removing the immo box.
It is advisable for everyone using the Abrites diagnostics for Toyota/ Lexus/ Scion to have such a key. Please note that you will need a PROTAG programmer for this production.
www.abrites.com
Abrites Diagnostics for Toyota/Lexus/Scion User Manual
41
Please follow the instructions as described below:
1. Please locate and remove the smart system (usually located behind the glovebox)
2. Read and save the 93C86 EEPROM from the smart system. Use a programmer
3. Open the Abrites diagnostics for Toyota - go to special function Transponder tool and select Transponder by dump.
4. Load the 93C86 EEPROM and the software will tell you what type of transponder you need
5. The software will modify the dump in a way that you will be able to have a master key. You need to write this modified dump to the Smart unit.
6. Now you have a master key and the car can be started.
7. Use the Key learning to learn a second key. You now have a master and slave key.
if you prefer to use virgin dumps follow the procedure bellow:
1. Be sure that smart system and ID box are virgin
2. Connect units to the vehicle DO NOT TOUCH START BUTTON!
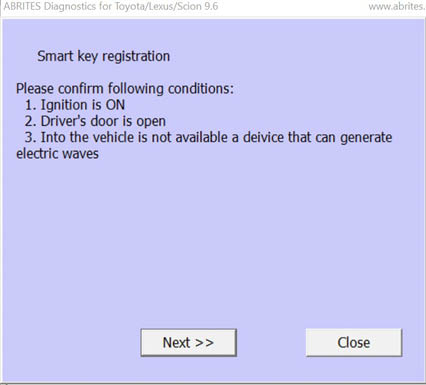
3. Connect Abrites Diagnostic for Toyota and select function “Key Learning” - DO NOT TOUCH START BUTTON just leave the door open.
4. Register 2 keys (follow instruction on the display)
5. Disconnect the AVDI
6. Close driver door and try each remote
7. Open driver door
8. Turn ignition ON (for first time)
9. Short PIN 4 and PIN 13 of the OBDII for 45 minutes
10. Turn OFF ignition
11. Remove the link between pin 4 and pin 13
12. Close the door
13. Open and close 6 times with each remote control
14. Leave the vehicle for 5 minutes locked
-> units are synchronized
www.abrites.com
Abrites Diagnostics for Toyota/Lexus/Scion User Manual
42
Please follow the instructions as described below:
1. Close all doors except driver’s
2. Insert and remove key from slot twice
3. Close, Open, Close, Open driver’s door
4. Insert and remove key from slot
5. Close, Open, Close, Open driver’s door
6. Insert key in slot
7. Close driver’s door
8. Turn IGN ON and OFF
9. Remove key from slot - door locks cycle
10. Press and hold the lock and unlock button for 1 second, release and then press lock button for 3 seconds
11. Locks cycle
12. Open, Close, Open driver’s door
Note: This procedure is valid for the oldest keyless-entry system (e.g. Toyota Prius second generation XW20 2003-2009 ).